Flatter Files is designed to distribute your content digitally in a controlled and secure manner. Ideally your content will be made accessible digitally all the way to the shop floor and even into the field. Digital access on the shop floor has many advantages and Flatter Files makes this extremely easy via super fast search, immediate preview images, and quick access to the drawing and supporting files. To make digital access even better, we are happy to announce that Flatter Files now supports barcode scanning as an input method for quickly finding the correct item. This makes finding and viewing content digitally so much easier. Simply scan a barcode and you end up with digital access of the correct item. No need to search for a part number or scroll through multiple search results. Barcode scanning is supported directly within the mobile applications for iPhone, iPad, and Android. In addition, a USB barcode scanner attached to a computer can easily be used with the Flatter Files web application.
Mobile Barcode Scanning
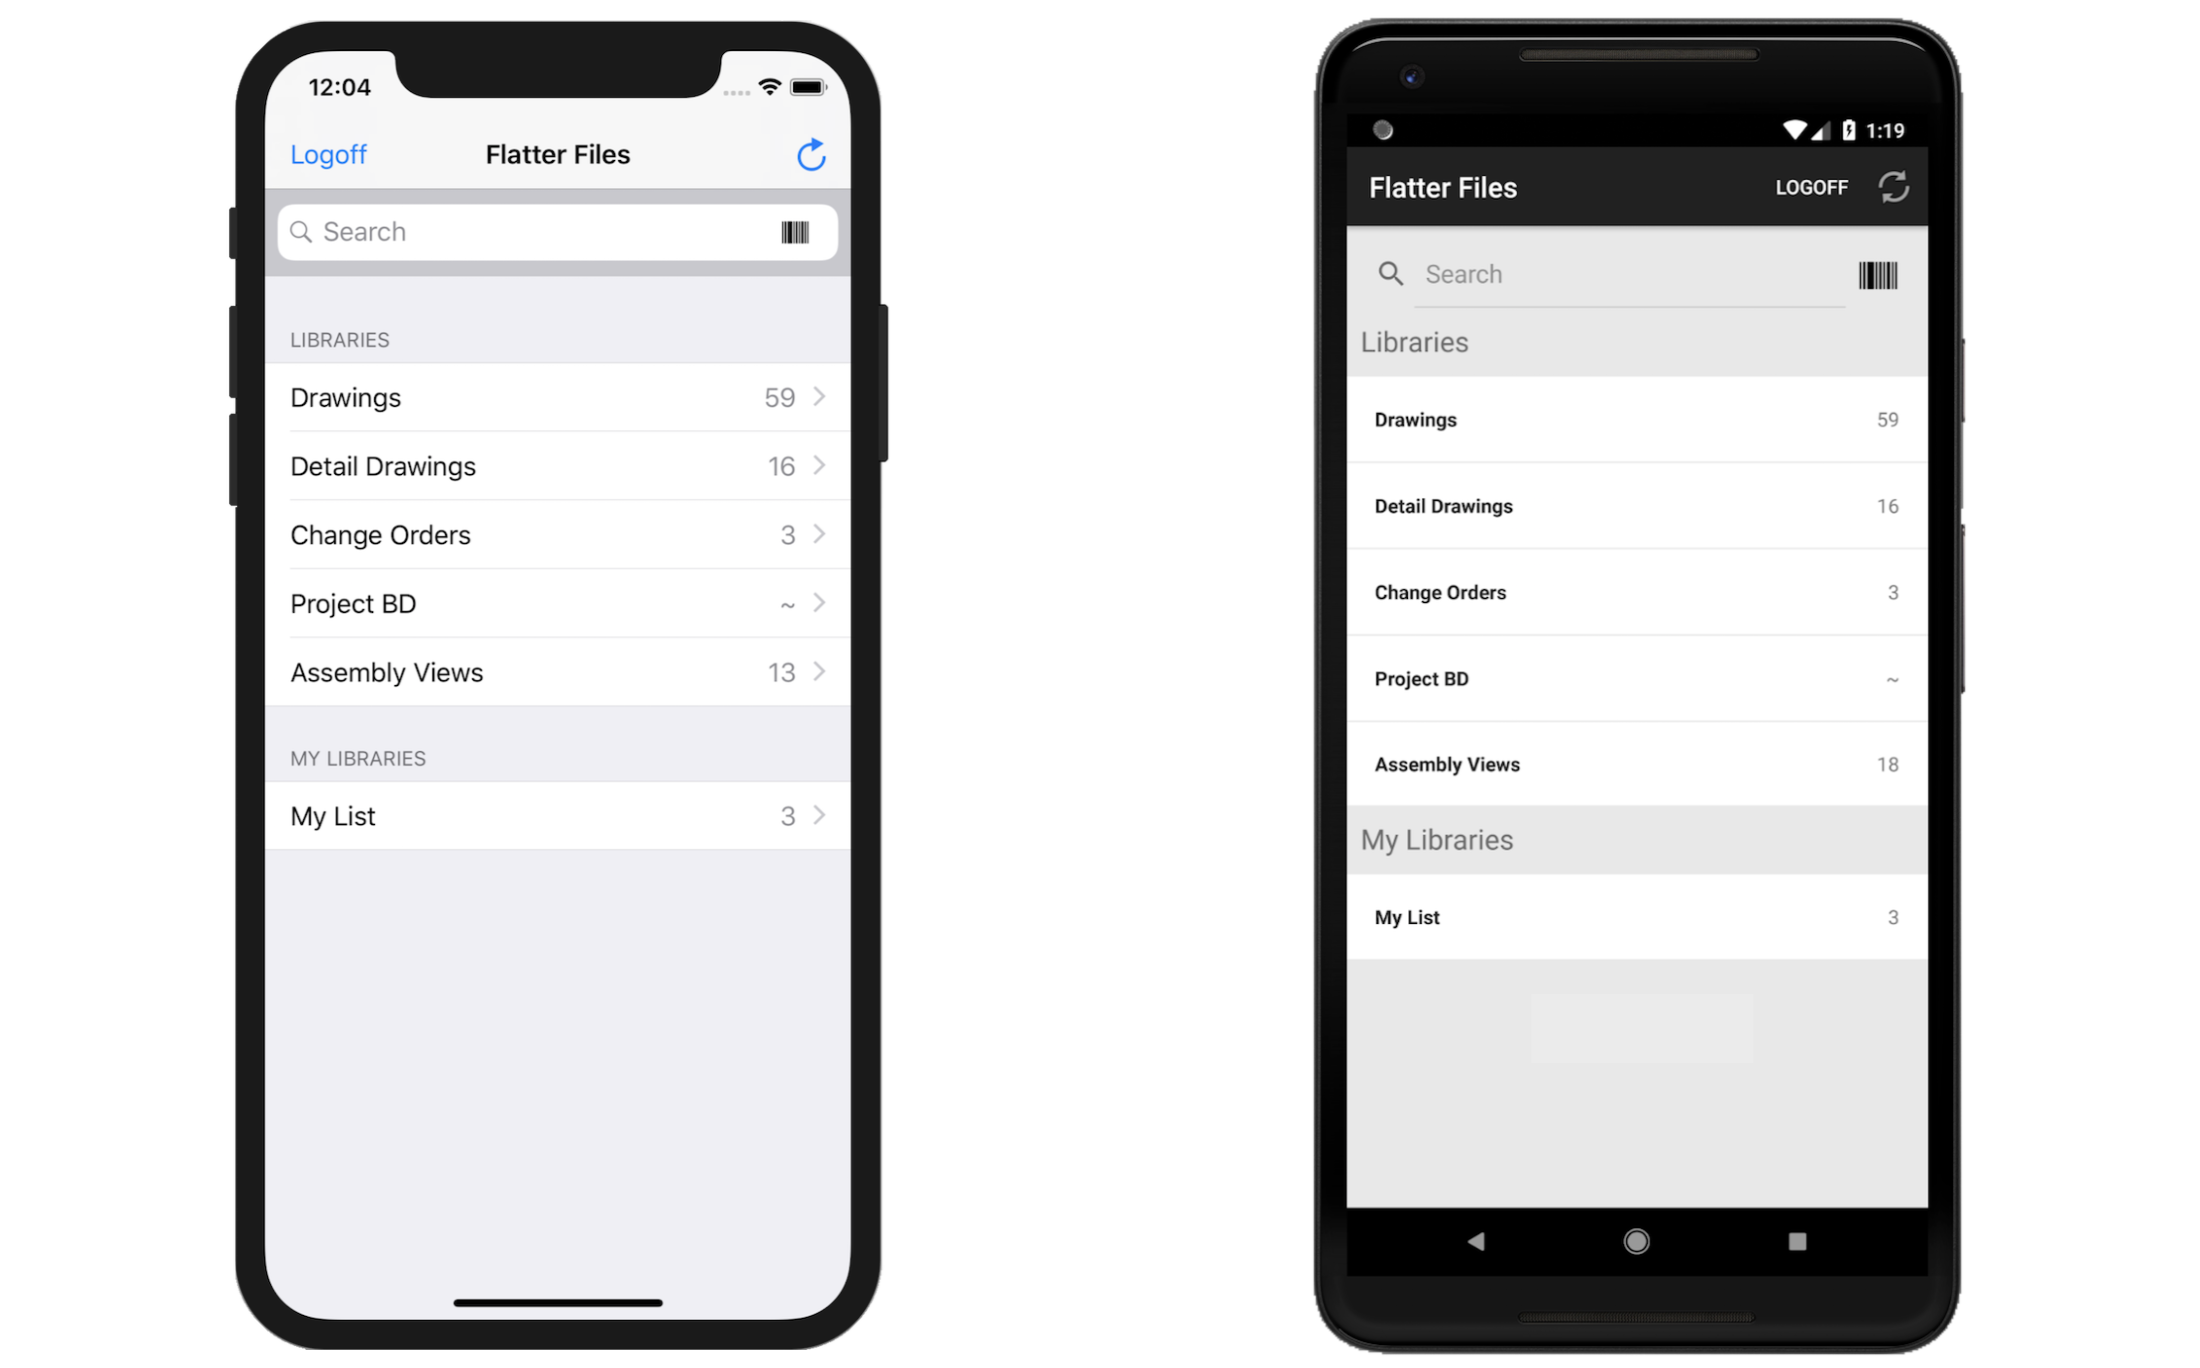
The Flatter Files iPhone, iPad and Android applications now include a simple barcode icon on the main page of the application as shown in the image below. Users of the application can simply tap this icon at which point your camera will be turned on and can be pointed at a barcode. Once a barcode is found, a quick search on Flatter Files automatically occurs and if a matching item is found then that item is immediately displayed.
USB Barcode Scanning
Using a USB barcode scanner is simple to setup. Once you have a USB barcode scanner it can be used to scan barcodes and enter text into any normal input. For Flatter Files, we have created a dedicated input page that users can use. The page only displays an option to enter an input value or scan a barcode making the process slightly simpler for the user. This dedicated input page can be accessed by simply going to the URL shown below:
https://www.flatterfiles.com/input
Once this page has loaded, the text input is already selected such that you can simply scan the barcode with the USB barcode scanner. This will result in an immediate search for the item. If a matching item is found then that item is immediately displayed.
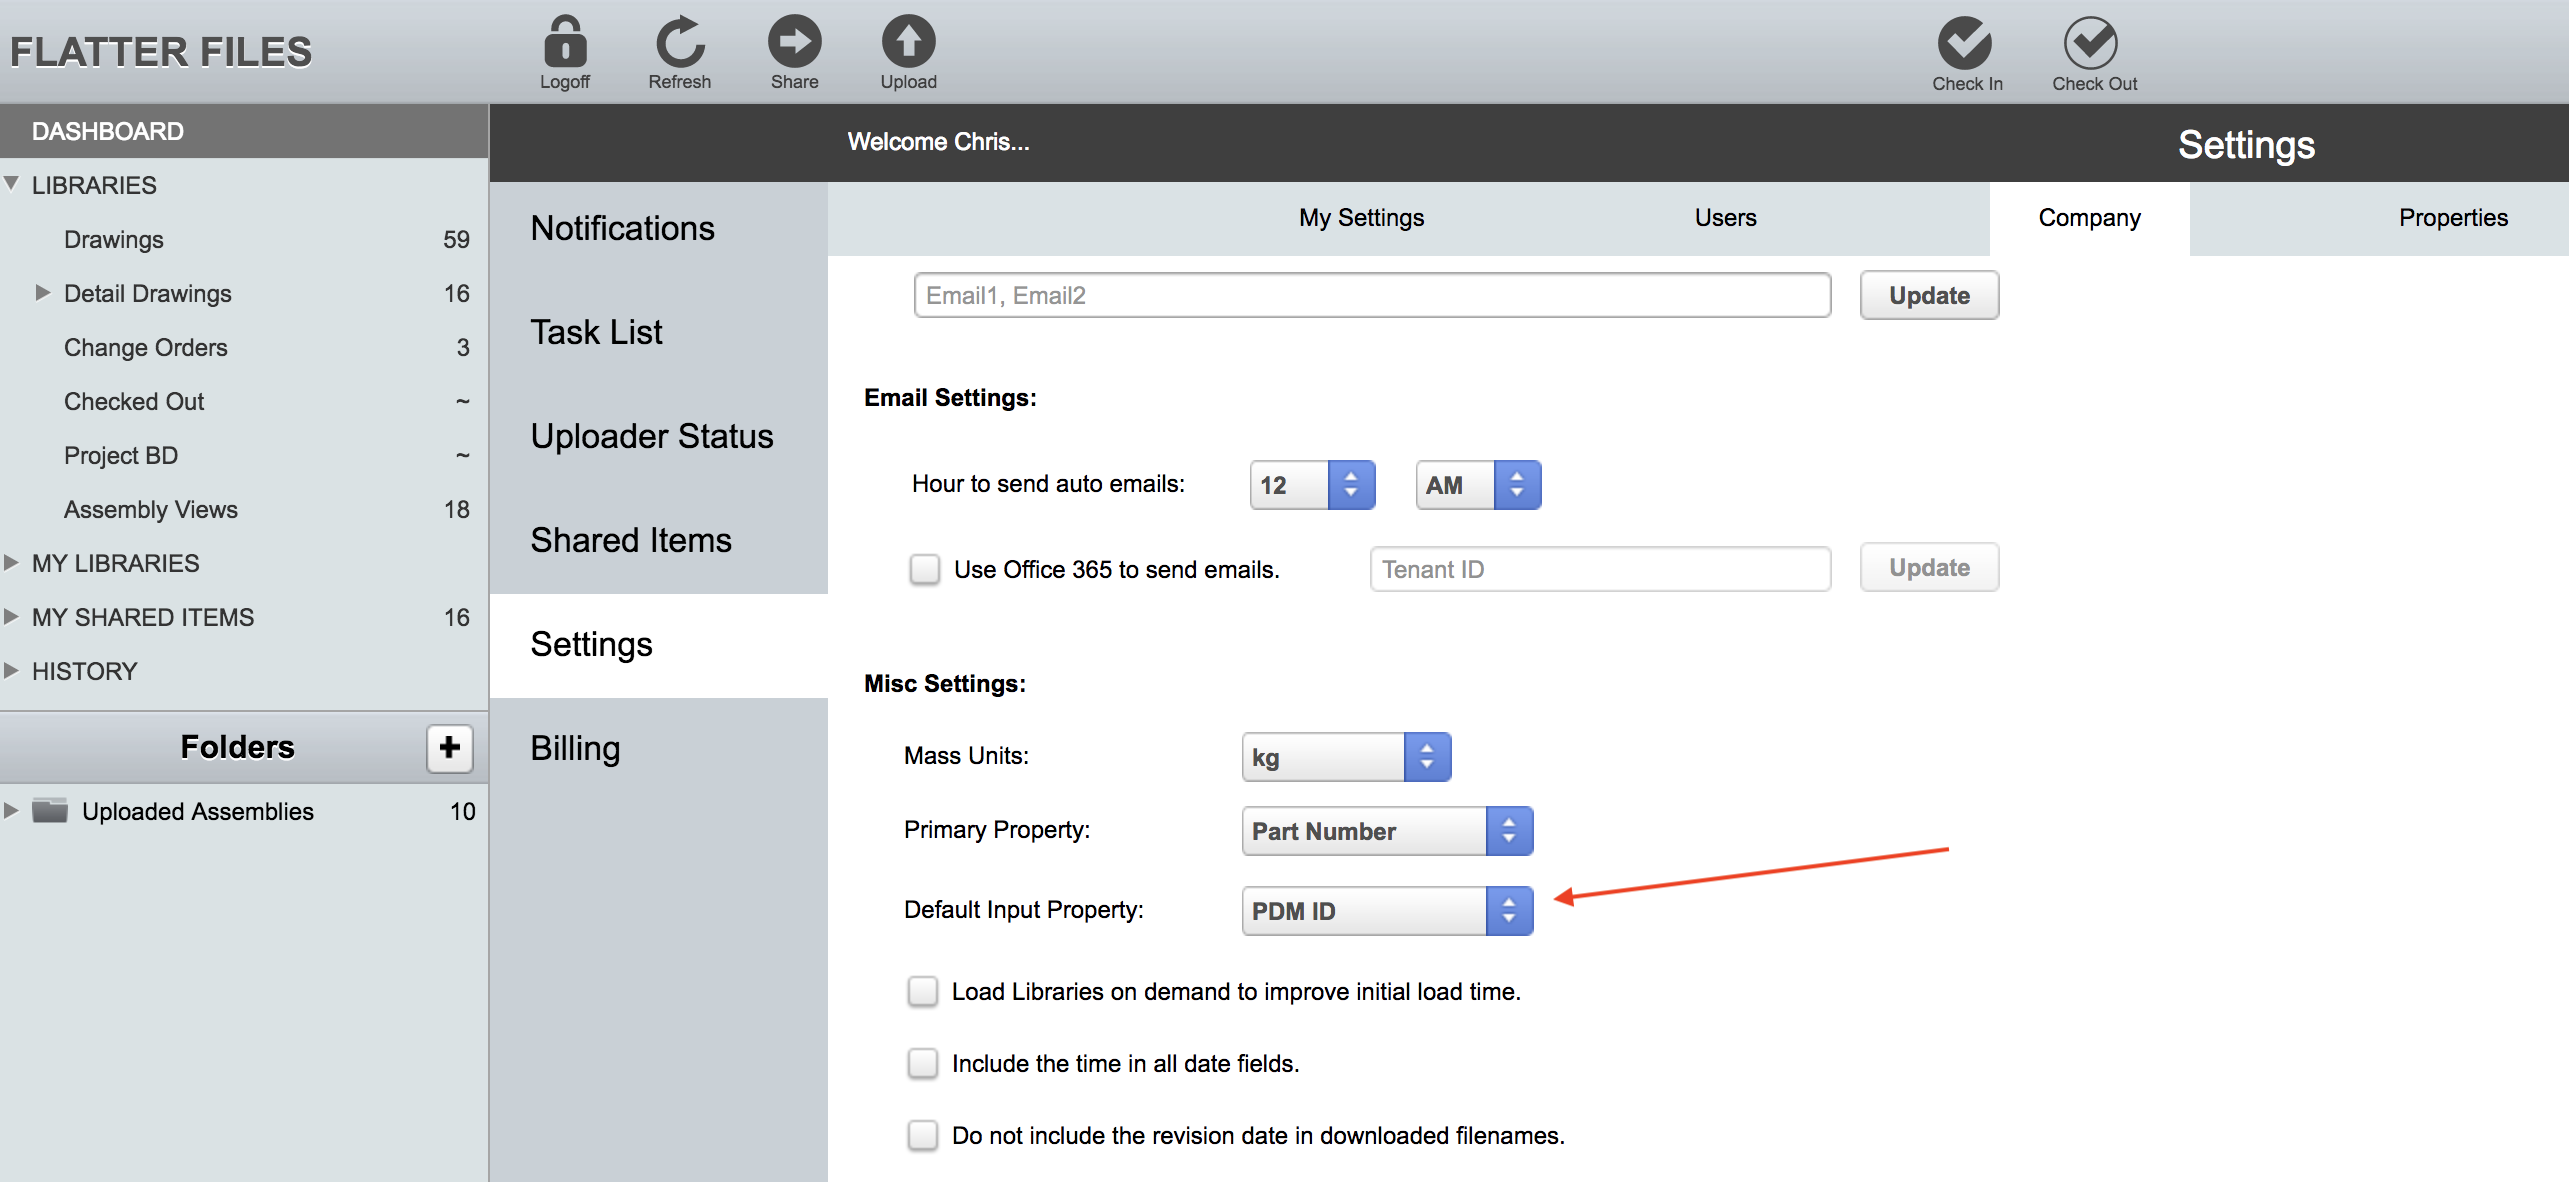
You will notice that the input page shown above includes a property selection option. The default value is set to the PDM ID meaning that the barcode scanned should point to the corresponding PDM ID for the item. This can easily be switched to Part Number or another custom property. To change the default input property go to Dashboard > Settings > Company Settings > Misc Settings as shown in the image below.
Change the default input property to the custom property that you use for generating the barcodes. Once this property has been changed then that property will always be selected when loading the input page and that property will also be used by the mobile apps when searching for an item that was scanned.
Generating Barcodes
There are many ways to generate barcodes and to incorporate the resulting barcodes into your production workflow. One option is to add barcodes to your production management documentation. Most ERP or similar software systems support barcode generation such that those documents can easily be created and then scanned. In addition, you could generate barcodes and place the barcodes for the corresponding drawing at the various work stations.
Flatter Files can also be used to add a barcode onto your drawing. The idea behind this capability is that it allows you to support both paper and digital methods of content distribution. Imagine your shop prefers to have the drawing printed but at the same time they would like an option to view the 3d model directly on the shop floor. If there is a barcode on the drawing, then the user simply scans this barcode at which point they have access to the same item on Flatter Files. This gives them access to not only the drawing but all of the supporting files that they have been given access to. Thus, if they have access to it then a corresponding 3d model could easily be viewed. This is a great way to augment the standard paper drawing with additional content.
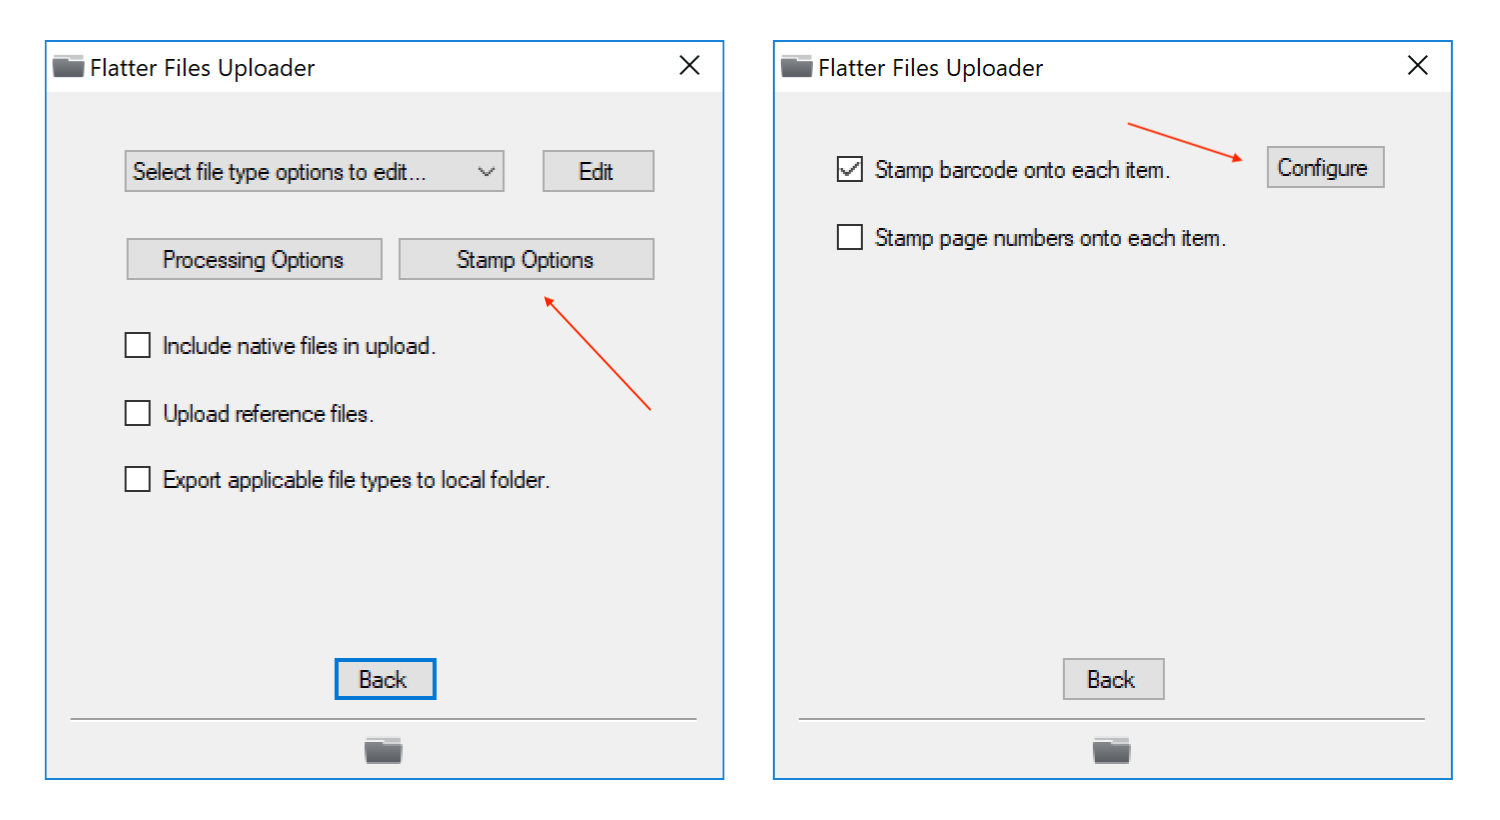
Adding barcodes to all of your drawings and documents uploaded to Flatter Files can be accomplished by simply configuring the new barcode stamp option in the Uploader for the appropriate folder configurations. Go to the Uploader > Edit Configuration > Folder List > Select the folder configuration > Edit > Click the “Select” button next to File Types > File Type Options > The page shown on the left of the image below should now be shown.
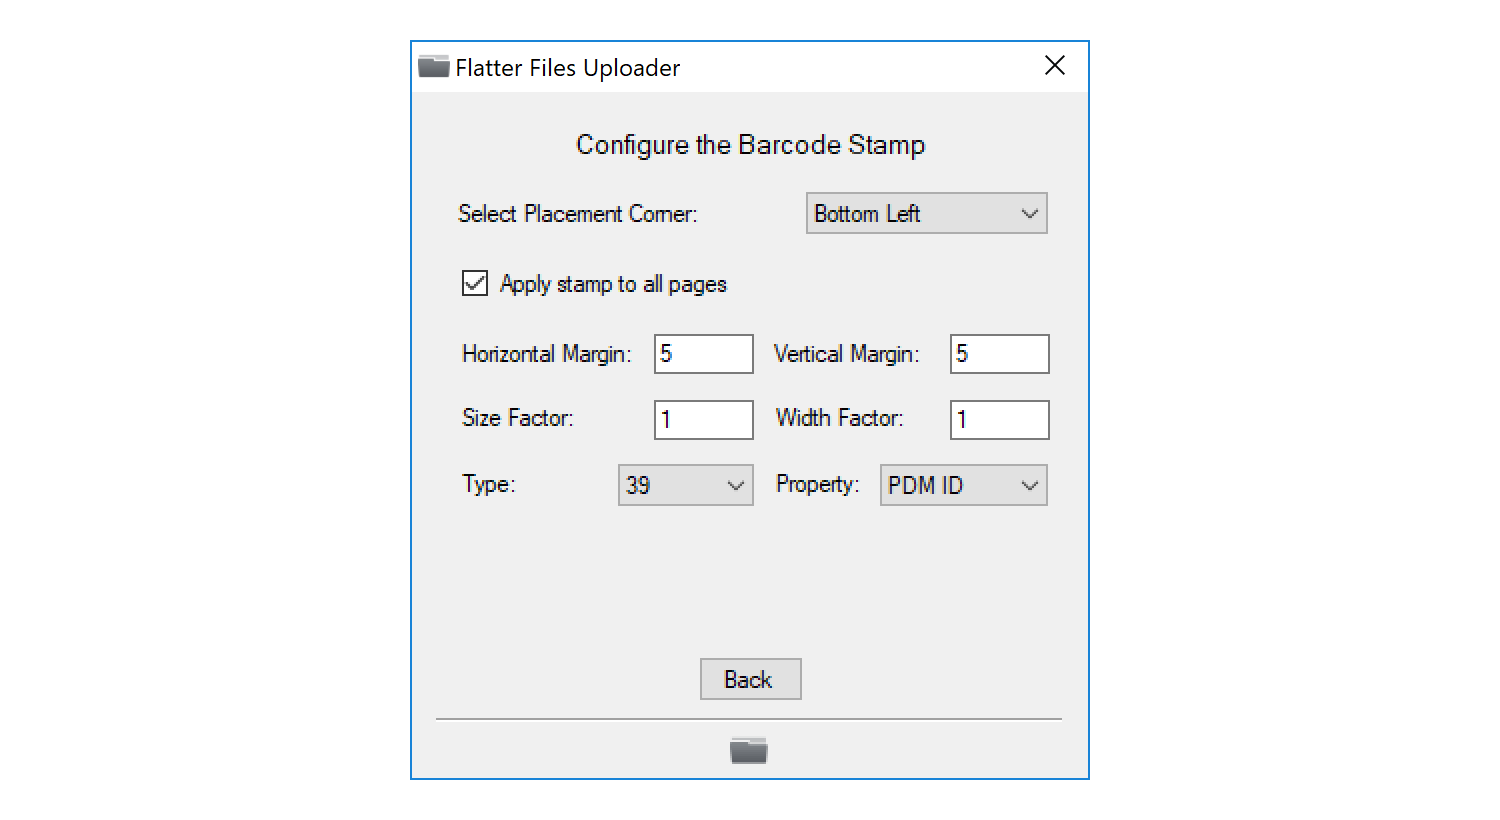
As shown in the image above, click the “Stamp Options” button, enable the barcode stamp and then click the “Configure” button. This will display the page shown in the image below. Configure the barcode placement as desired and select the appropriate custom property that should be used.
This is all that is required to add barcodes to all of your items uploaded to Flatter Files. Obviously, this barcode is only useful if the user already has access to the drawing that they can then scan. As mentioned previously, the most useful place for the barcode would likely be on some type of production documentation or placed directly at the work station.
As you can see, the ability to scan barcodes such that you can easily access the drawing has all kinds of potential to help you improve productivity within your production process. With Flatter Files, barcode scanning can easily be implemented via the mobile applications as well as a standard USB barcode scanner. If you have any questions please contact us at [email protected]. We would be happy to help you evaluate ways to implement barcode scanning within your production facility.
Flatter Files can now be used to automatically create 3D PDFs and STEP 242 files using SOLIDWORKS MBD. If you have decided to implement a model based workflow for communicating your design data then Flatter Files can now facilitate this workflow. Obviously, distributing your design data via paper is not an option with MBD. Thus, using a centralized system like Flatter Files to organize, simplify, and control access to the resulting design data is essential to your successful implementation. Flatter Files has been used for years to implement both partial paperless and completely paperless workflows in organizations. Thus, it is a mature and proven solution to provide the digital access to viewers required to implement MBD.
The integration of SOLIDWORKS MBD allows for two types of folder configurations:
- SOLIDWORKS Drawing (slddrw) files are ignored and a corresponding 3D PDF is created for each model.
- Model files are checked for a corresponding SW Drawing and if one isn’t found then a 3D PDF is created for that particular model.
The two configurations can easily be mixed and matched for different folders that are being processed by the Uploader giving you the flexibility needed. Option 1 is ideal for folders where you don’t expect any drawing files and if there are drawing files you don’t want to make those drawings accessible to your viewers. Option 2 is ideal for folders where you need to upload both 2D PDFs for your traditional drawing files and 3D PDFs for models that don’t have a corresponding drawing.
Keep in mind that Flatter Files is still organized around a primary deliverable that remains up to date and connected to the original source file. Up to this point, the primary deliverable has always been a 2D PDF created from a drawing or document file. With SOLIDWORKS MBD integration, the primary deliverable can be a 3D PDF created from an MBD template.
Whether you are uploading 2D PDFs from drawings or 3D PDFs from model files, each item uploaded can contain additional content such as STEP, IGES, DXF and many other file types. SOLIDWORKS MBD now allows the STEP file that is created and uploaded by the Flatter Files Uploader to be a STEP 242 file. STEP 242 files can include the dimensions, tolerances, notes and other design data that is defined within the source model file.
Viewing 3D PDFs
The built in PDF viewers across the Flatter Files applications do not currently support displaying the 3D models within the PDF. Instead we have integrated the Flatter Files web application to use Adobe Reader to display the 3D PDFs. All items that consist of a 3D PDF are marked as being a 3D PDF such that when a user double clicks to view the item the PDF is automatically displayed using Adobe Reader instead of the built in PDF viewer. This requires the installation of the Flatter Files browser extension that is available for Chrome and Firefox. Users will automatically be prompted to install the extension when first attempting to view a 3D PDF.
Even though 3D PDFs have been around for quite some time, the specification is still relatively new. I have tested many PDF viewer applications and so far the only application that I have found that properly displays 3D PDFs is Adobe Reader.
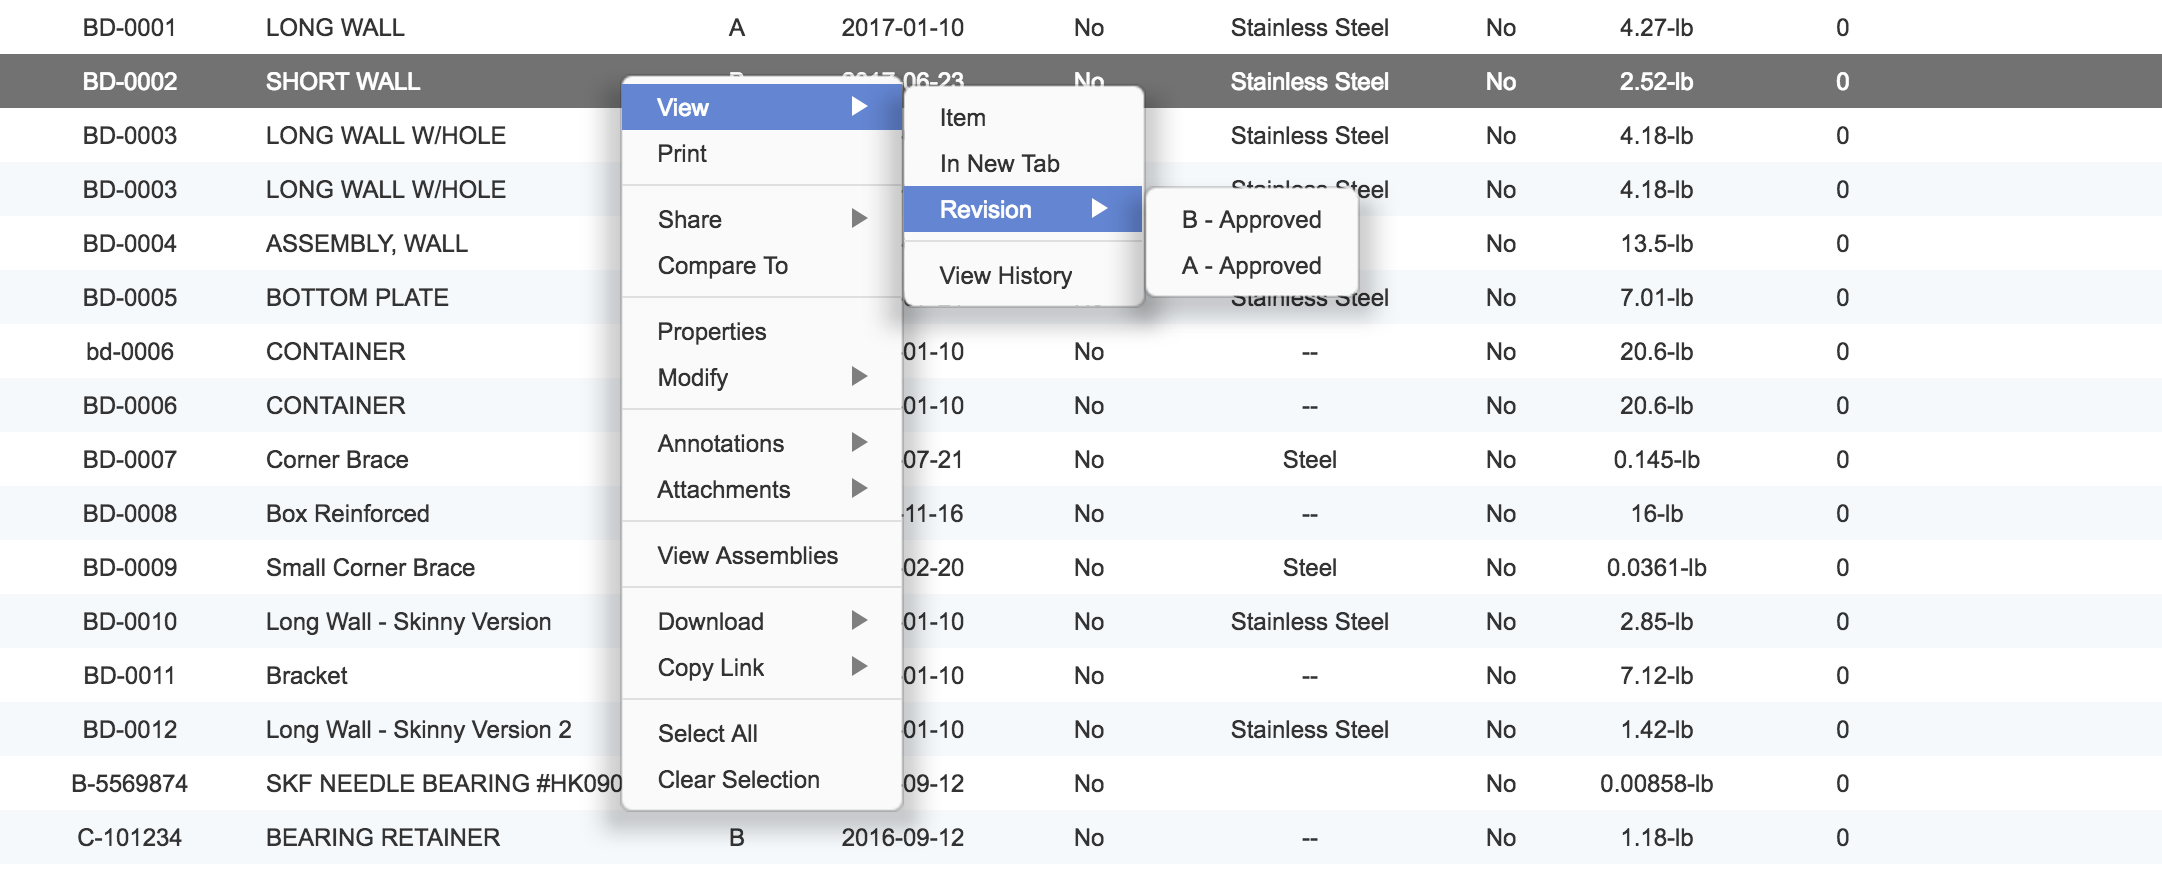
Since the built in PDF Viewer is not used, the buttons to view previous revisions are not available. Thus, we have added an option in the right click menu to allow viewing a specific revision. This option is only available if more than one revision exists and the user has access to the previous revision. The new menu is shown in the image below.
Configuration
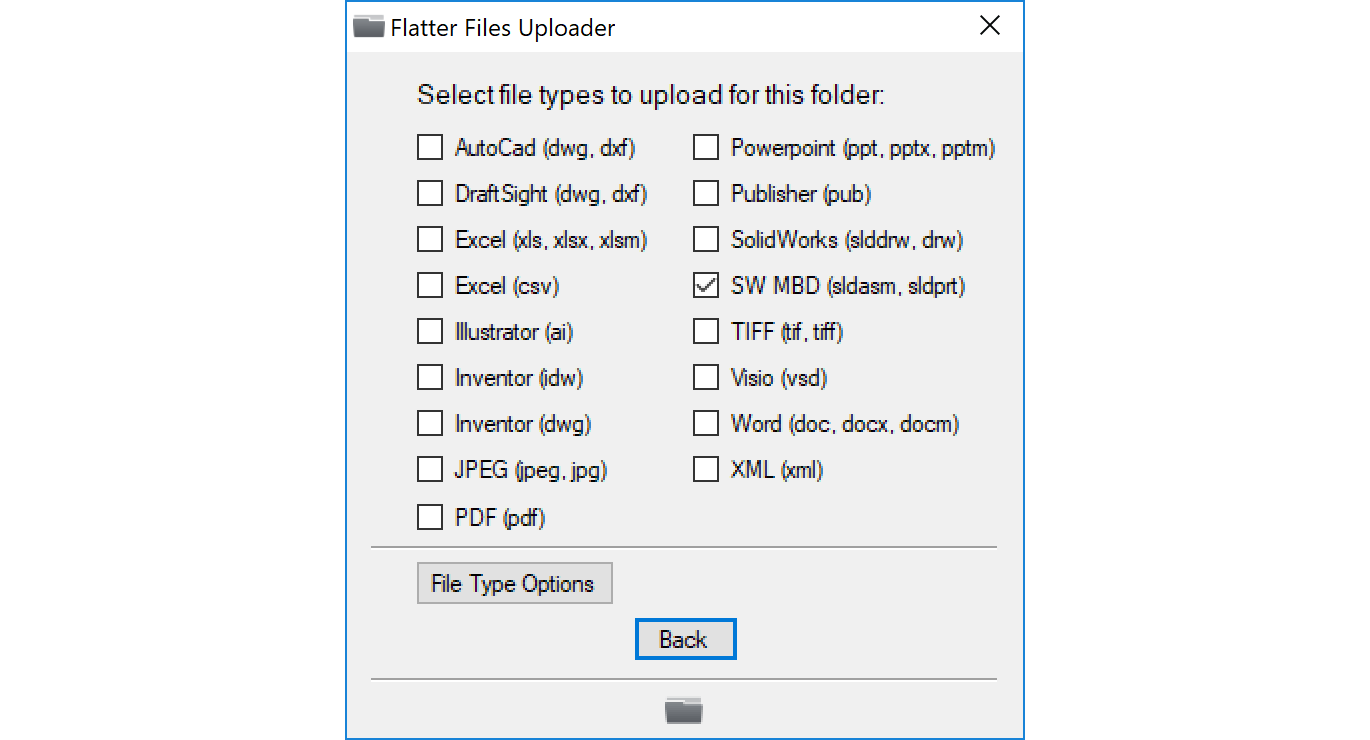
If you are configuring a folder to use option 1 such that all drawing files are ignored then you simply select SW MBD as the file type as shown below and then skip to the SOLDIWORKS MBD Options.
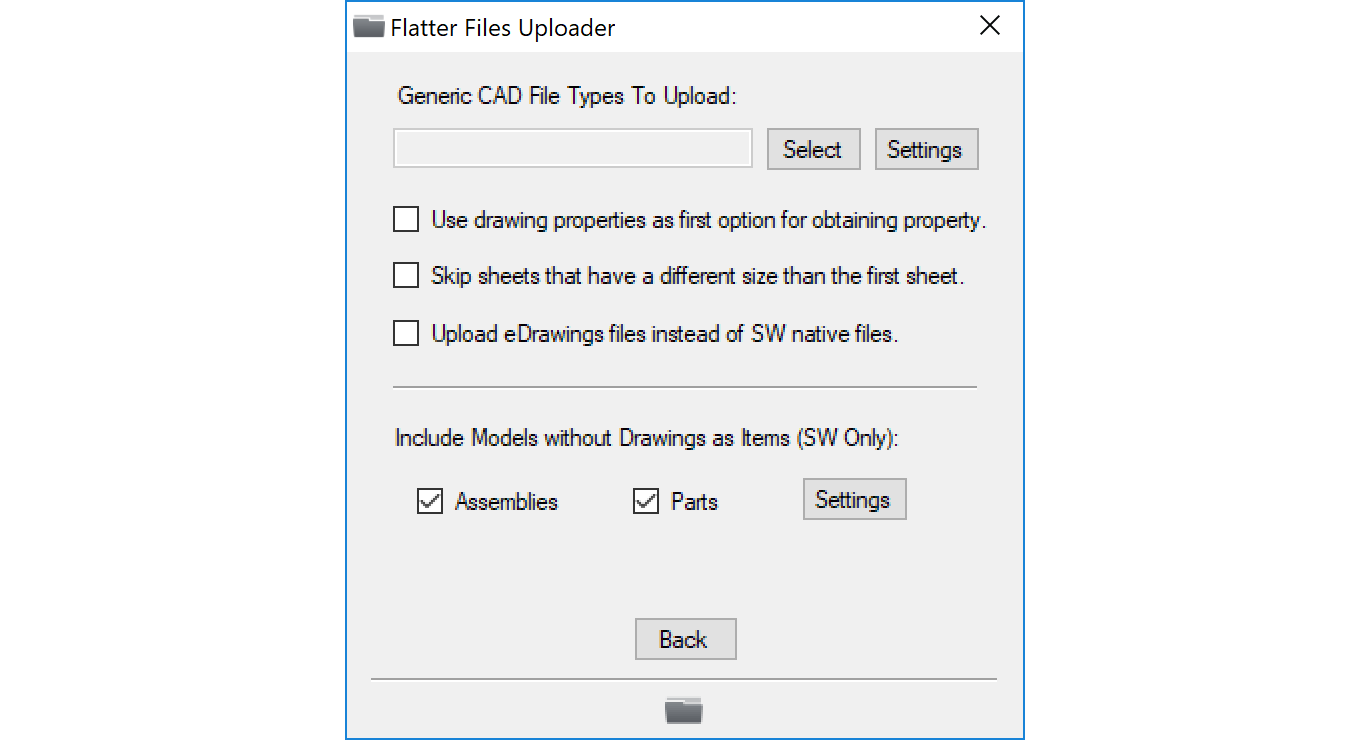
You will notice that SW MBD and SolidWorks can’t both be selected. Thus, if you are using option 2 to upload only 3D PDFs for files without a corresponding drawing you must first select SolidWorks as the file type. Then proceed to the SolidWorks/Inventor file type options as shown below.
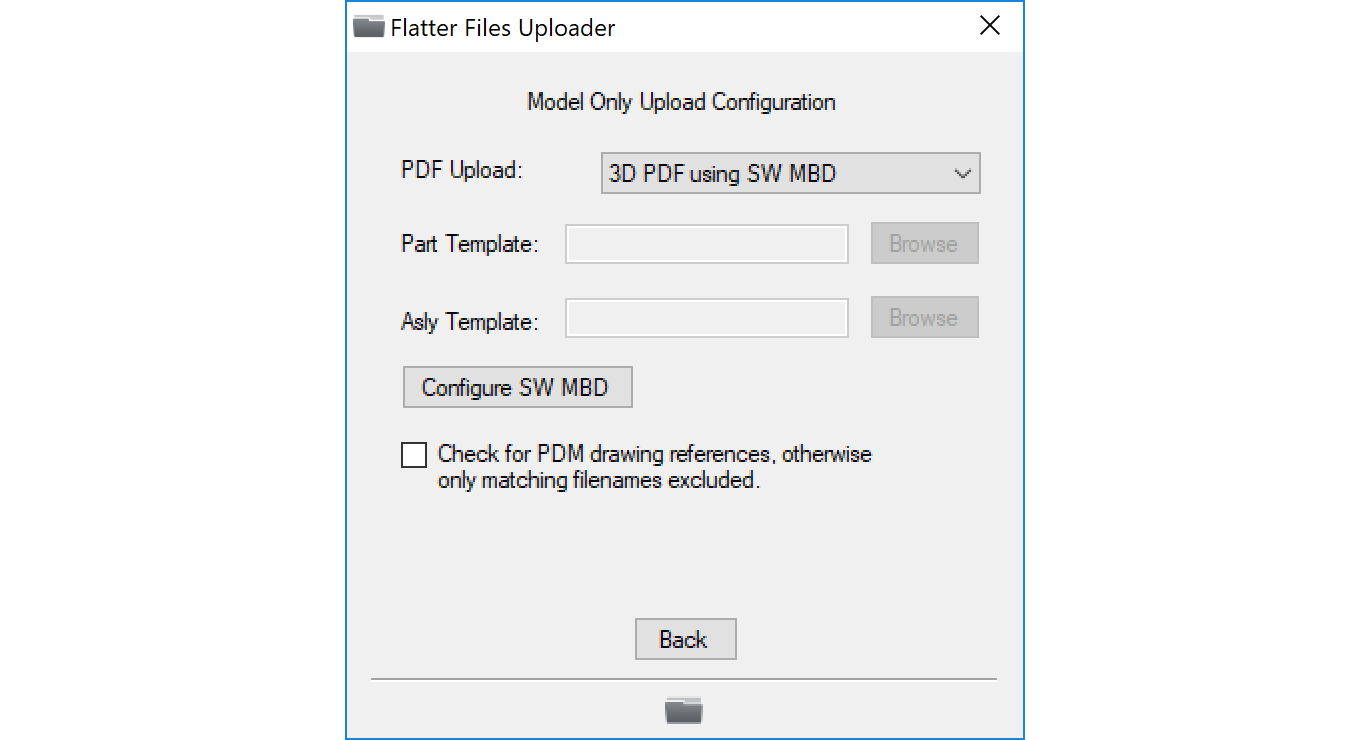
At the bottom of the SolidWorks/Inventor options page there is the option to include items without a corresponding drawing. You can elect to enable just parts, just assemblies or both parts and assemblies. Once enabled, you can click the settings button to display additional settings. The resulting settings page is shown in the image below.
There are multiple options for the type of upload that should occur for these model only options. The last option in the drop down is to upload a 3D PDF using SOLIDWORKS MBD. The other options are useful for scenarios where you either don’t have MBD or simply want to upload a simpler PDF than the templated MBD 3D PDF. For example, you could upload a 2D PDF of the model using a drawing template.
A key element to only uploading 3D PDFs for items without a drawing is determining which models don’t have a drawing. The simplest and fastest method is to exclude any models that have a corresponding drawing with the same filename. In addition, if you are using SOLIDWORKS PDM then you can also exclude models that have a parent drawing reference. To enable this additional check you must enable the setting to do so. Enabling the setting is required since it does impact the amount of time it takes to process files. Thus, the option should only be enabled if your drawing and model filenames do not match.
SOLIDWORKS MBD Options
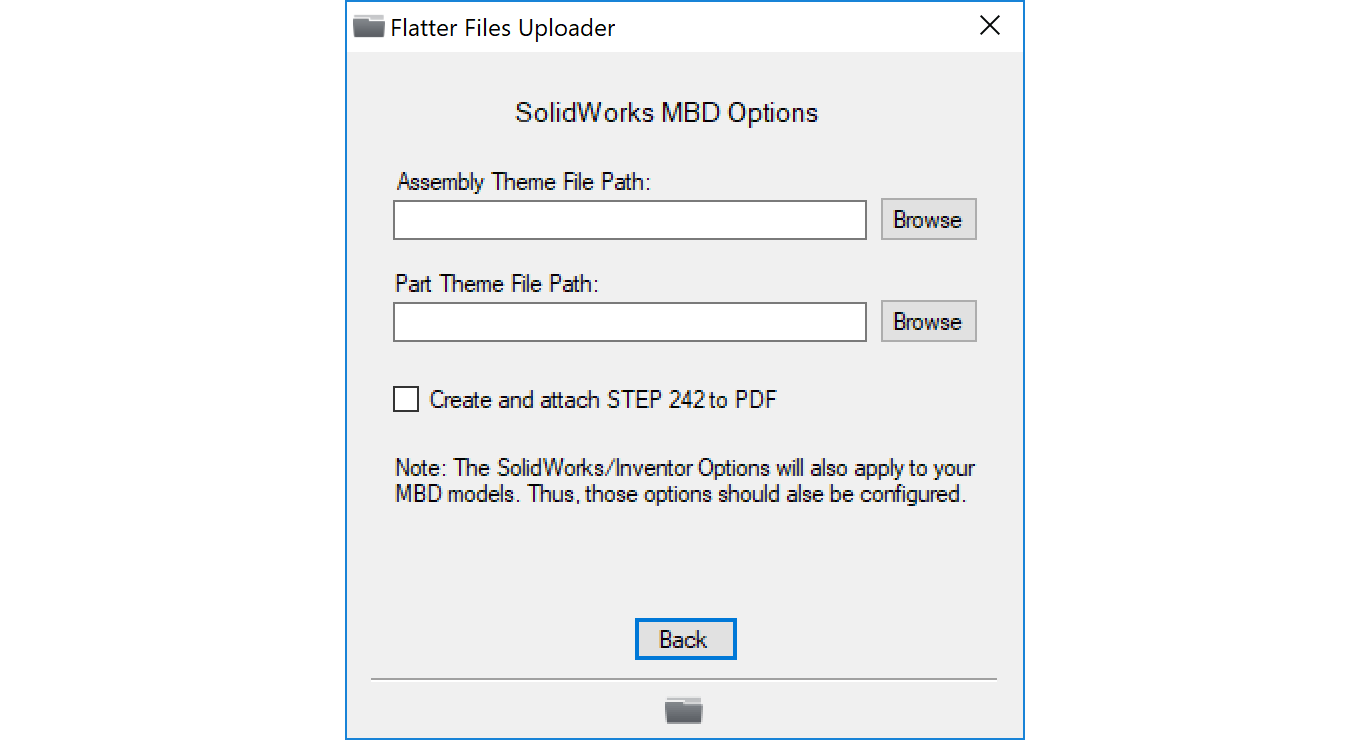
Whether you are uploading all models as 3D PDFs or only models that don’t have a corresponding drawing, there are just a couple of MBD specific settings. You can get to these settings either from the model only settings page shown above or by selecting the SOLIDWORKS MBD file type settings option.
The only required setting is that you must select the MBD theme that you would like Flatter Files to use when creating the 3D PDF. A single folder configuration can have a separate part and assembly theme. If you need to use different themes for different projects or products, then you can simply define additional folder configurations with different themes as required. The SOLDIWORKS MBD settings are shown below:
As you can see, you simply define the two themes that you would like the Uploader to use for each folder configuration. If you would like, the part and assembly theme can be the same. The only other MBD specific setting is whether or not you want to attach the STEP 242 file to the actual PDF file such that it is located within the PDF file.
In addition to those MBD specific settings, almost all of the traditional SOLIDWORKS configuration options will still apply to your MBD files. Thus, you will want to make sure that you configure those options as necessary. For example, do you want to include eDrawings exports, a DXF of the sheet metal flat pattern, a Parasolid file, or many other options.
Flatter Files now allows you to fully edit the email that is sent when sharing content externally. Previously, you could add an optional message and/or skip the email when creating the shared link but now you can view what is about to be sent and edit however needed. This also applies to anytime you resend the shared link.
The process of creating the shared link remains unchanged. Once you submit the shared link, the proposed email is displayed inside the web application as shown in the image below. At this point, the link is active and the shared link will be listed under “My Shared Items.” The email has been created and is displayed but hasn’t been sent.
The Edit Email view contains multiple options. First, the emails entered are listed as recipients. Additional emails can be added to the CC input and the share email will be sent to those emails as well but they are not automatically added to the shared link email list. By default each email address entered receives a separate email, but if you would prefer to send a single email such that everyone can see who received the email then enable the option to “Send as single email.”
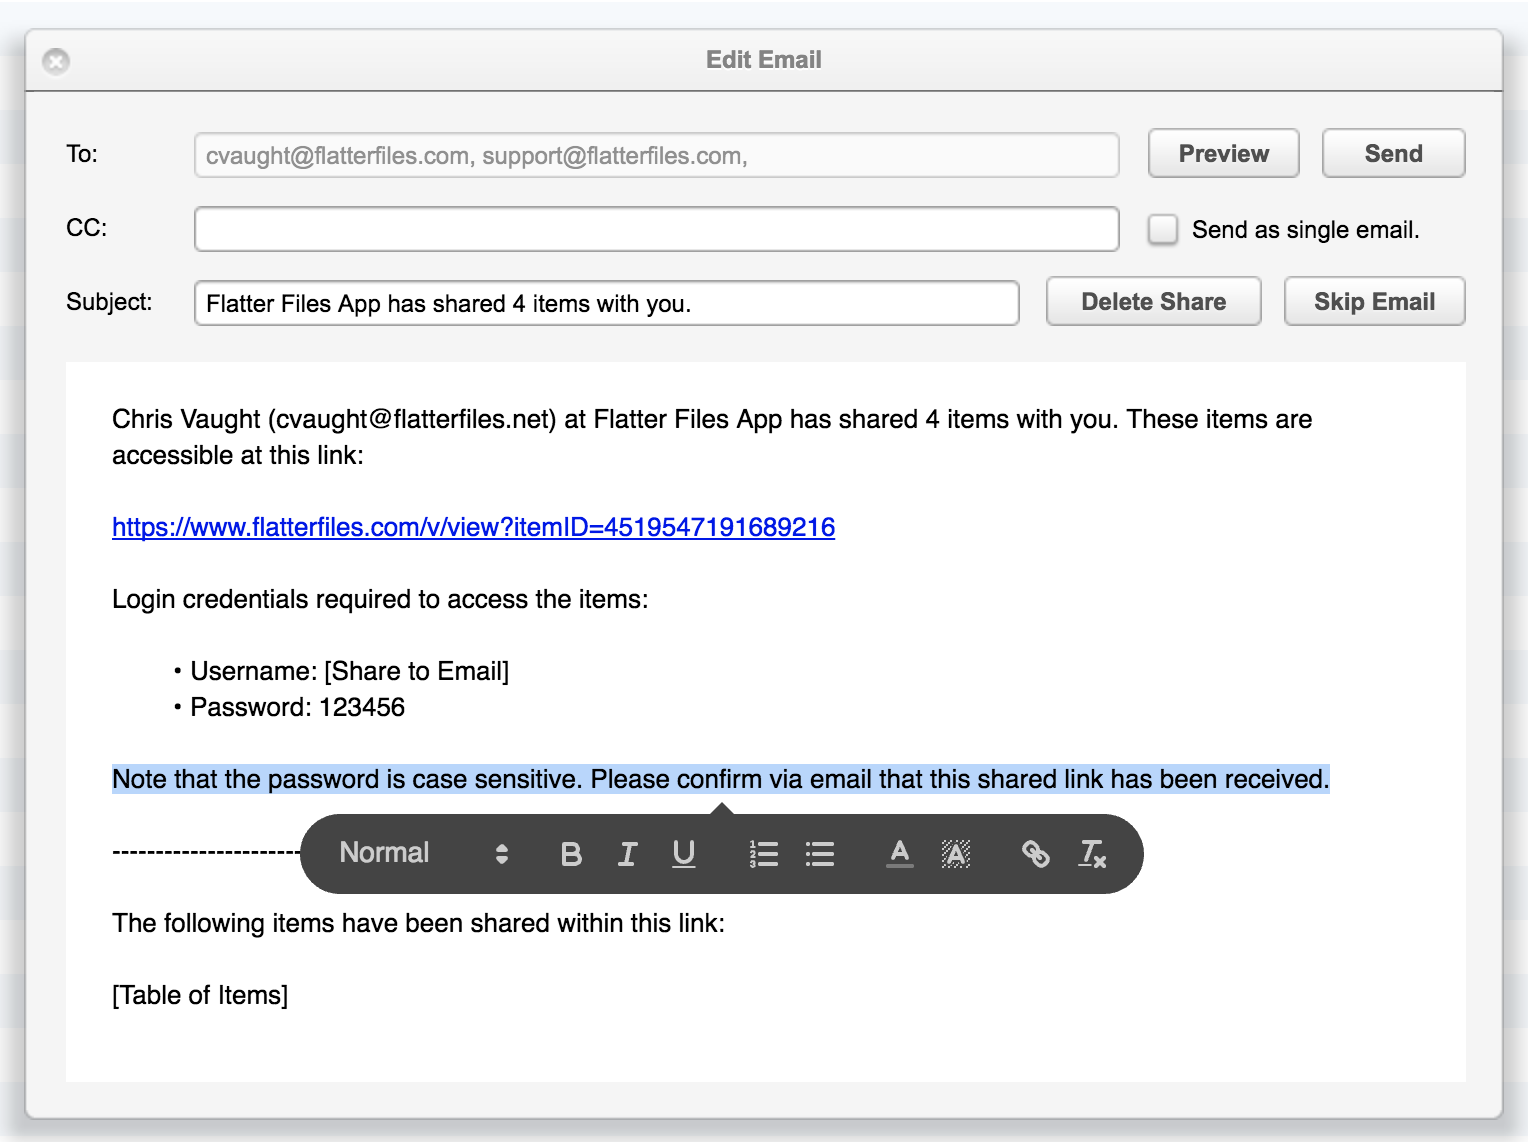
The subject line is displayed and can easily be edited. The full body of the proposed email is shown and can also be edited. If you would like to change or add formatting, simply select some text and the formatting toolbar will be displayed as shown in the image below.
The body of the email includes the email address and password that the recipient will use to access the link. Since multiple recipients are possible, the Edit Email view displays a special text placeholder equal to “[Share to Email].” If you would like to change the place of the email address you can simply move this placeholder text to a different location.
If you have configured the share email to include a table of the items being shared, there will be a second placeholder for the table. The placeholder text for the table is equal to “[Table of Items].” This placeholder text can also be moved and the corresponding table will be located wherever the placeholder text ends up.
The Edit Email view include four buttons. The “Preview” button will display a new tab with the email fully rendered such that it appears exactly how it will appear in the resulting email. If the email includes an item table then the preview will show the item table in its complete state.
Since the share has already been created, a “Delete Share” button is included such that you can easily delete the share if you decide you no longer want to create this shared link. There is also a “Skip Email” button if you decide that you want to wait to send the email. The share will still exist and at any point you can right click the shared link and select “Resend Link” to send the email. Clicking “Resend Link” will display the same Edit Email view such that the email can be fully edited before sending.
The last button in the Edit Email view is the “Send” button. Click the “Send” button once the editing is complete and you are ready for the email to be sent to the recipients.
Flatter Files now supports the ability to stamp the PDF when printing. There are three options for the content in the stamp. The first option is to stamp the current date and user name. This will mean anytime you view the printed drawing you will know exactly when it was printed and who printed it. The second option is to stamp custom text that the user enters onto the print. The third option is to include both the current date, user name, and custom text.
To enable the option to stamp your prints, an Administrator must first go to Dashboard > Settings > Company > Print Stamp Settings and enable the option shown in the image below.
Once enabled, when a user clicks to print the item they will be prompted to ask if they want to stamp the item or not. If you would like, you can make the stamp required for Viewers by enabling the “Require Stamp For Viewers” option. You can also make the stamp required for all users by enabling the “Require Stamp For All Users” option. When creating a stamp, Flatter Files allows you to control exactly where it is placed on the drawing and the size. To control these settings simply click the button titled “Default Settings” which will display the settings shown in the image below.
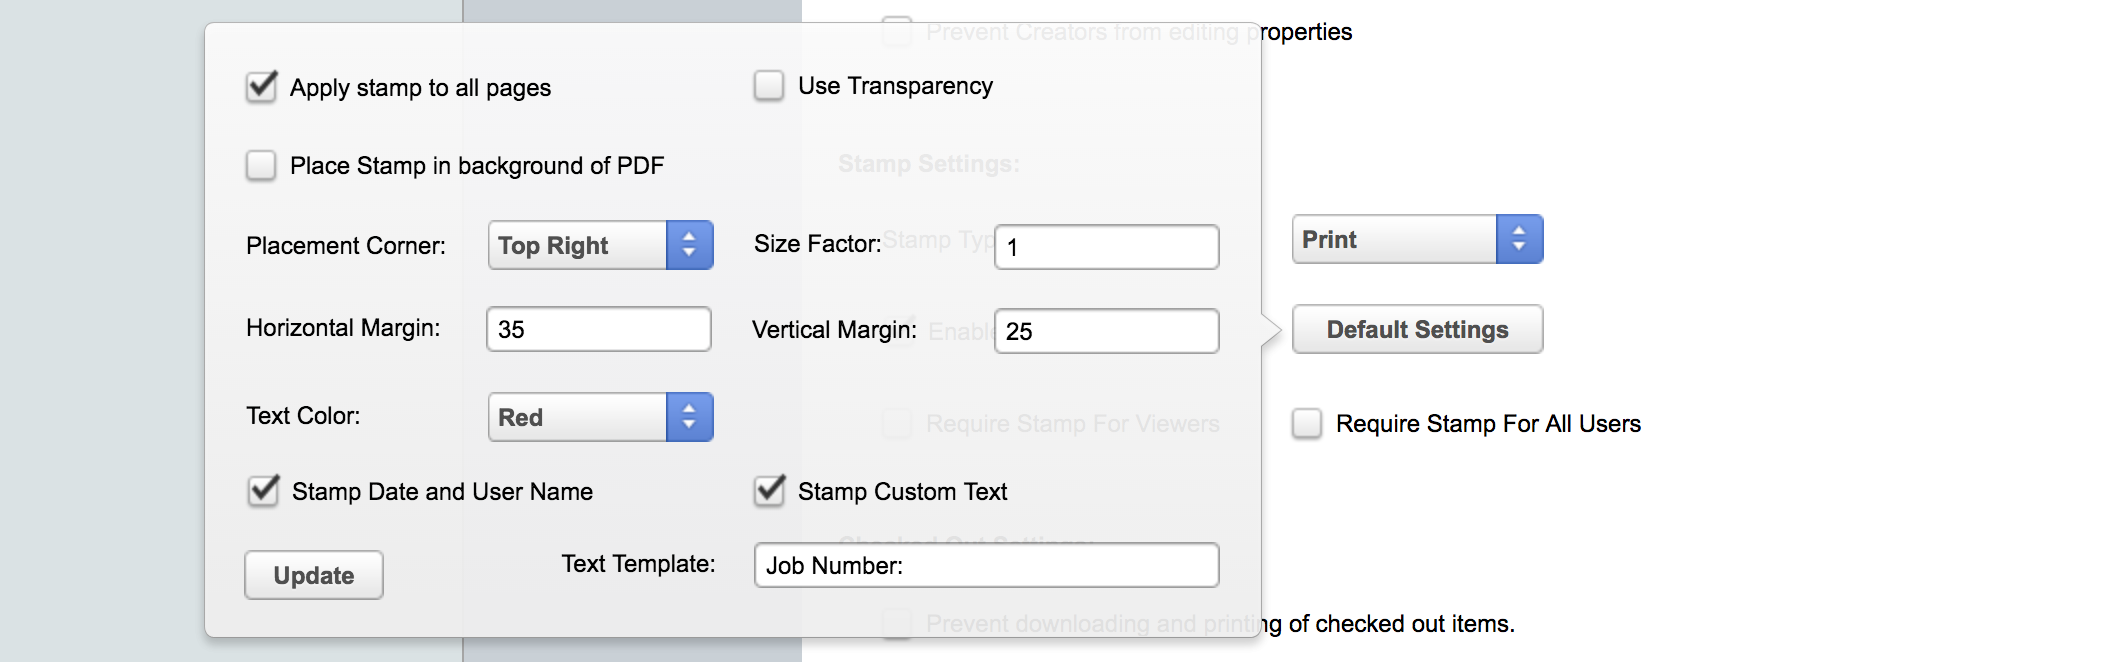
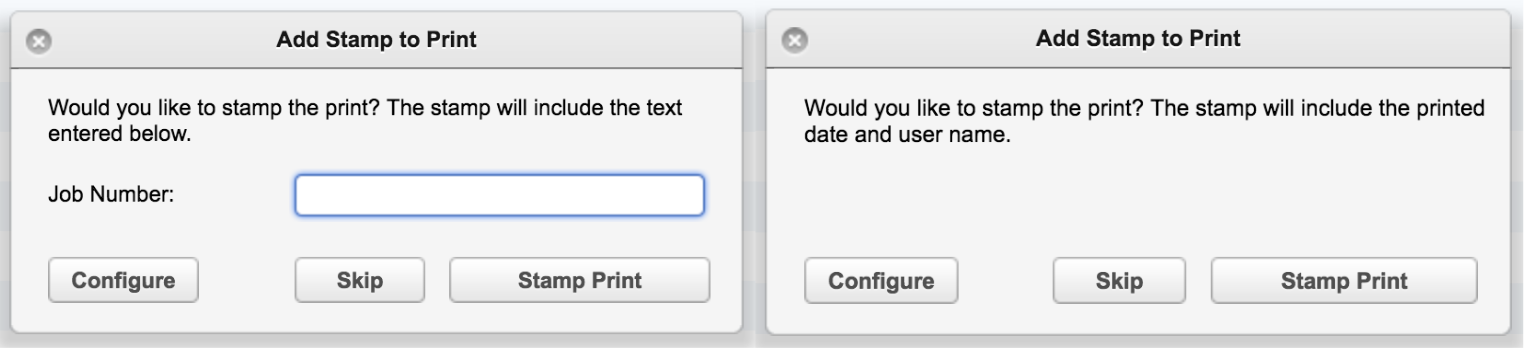
Most of the settings control placement, size, color and are self explanatory. The last two settings control the type of print stamp. If you simply want to stamp the date and user name then enable the “Stamp Date and User Name” option. To add custom text then enable the option to “Stamp Custom Text” which will display an optional text input that allows you to define a template for the custom text. For example, if you enter “Job Number:” then the text stamped on the drawing will be “Job Number:” and the additional custom text that they enter. The text entered will also be placed as the label of the prompt to enter the custom text. This is shown in the image below on the left. If the Template Text input is blank, then only what the user enters when prompted will be stamped on the drawing.
Both types of print stamps can be added to the drawing by simply enabling both options. The resulting stamp will have the print date, user name, and custom text entered.
The images above show the prompts that will be displayed when a user clicks print. The one of the left asks the user to enter the appropriate text for stamping and the prompt on the right will be shown when only the date and user name are being stamped on the drawing. At any point, the user can control the placement of the stamp by clicking the “Configure” button from within the prompt. This doesn’t allow them to change the type of print stamp but it does allow them to customize how the stamp looks and its location since sometimes different settings may be necessary for specific drawings.
The prompt above won’t be shown if the user is a viewer, the setting to require them to stamp the drawing is enabled, and the stamp type is to only stamp the drawing with date and user name. Basically there is nothing for the user to do so the stamp is simply added without the prompt. Otherwise, if the stamp is not required for viewers then the prompt will always be shown such that it can be skipped if necessary.
Examples of the different stamp types are shown below. If you have any questions or enhancement requests, please contact us at [email protected].
Date and User Name
Custom Text
Custom Text, Date, and User Name
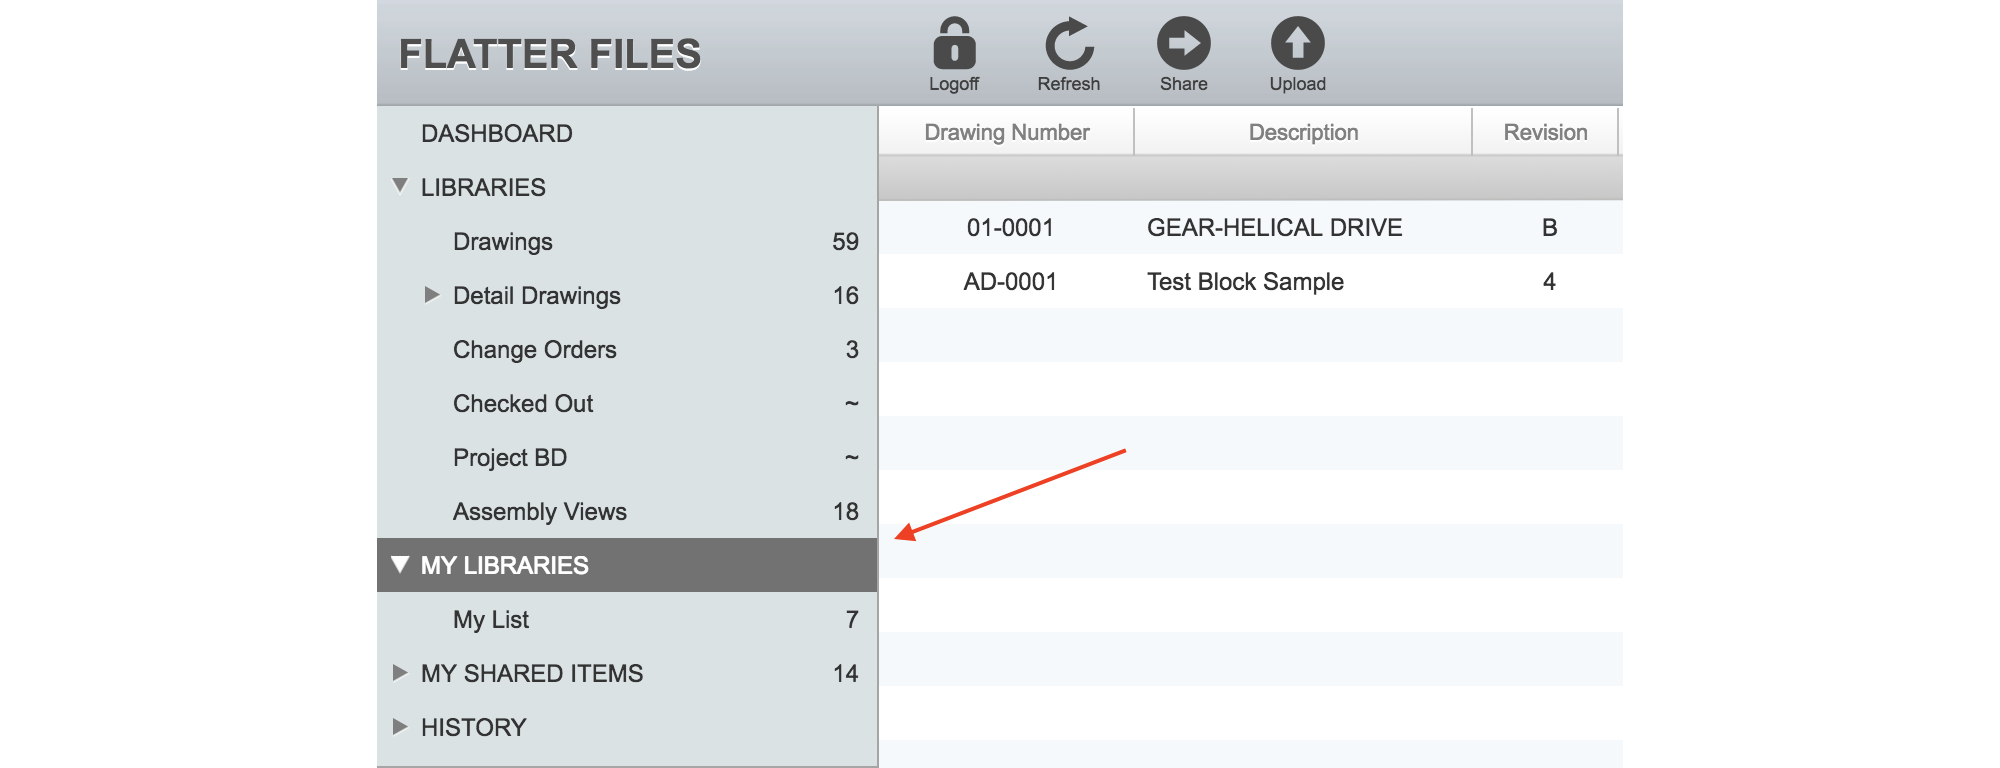
Flatter Files now supports user Libraries. On the left side of the web application you should see a new category called “My Libraries.” If you click on that you should see a Library called “My List.” This Library is a user specific Library that no one else can view and provides a useful way for users to create specific lists of items that they need to access. Items can easily be added or removed and multiple user Libraries can be created by each user.
To add items to one of your Libraries, simply drag and drop items into it. If you would like to add more than one item at a time, then select all of the items and drag the selection to the Library. To remove items from your Library, select the items you want to remove, right click on one of the items, go to Modify, and click “Remove From Library.”
The “My List” Library can be renamed and additional Libraries can be added. To rename the Library, simply right click on it and click “Edit.” Enter the new name and click Submit. To add additional Libraries, right click and click “Add Library” or “Add Sub Library.” Enter an appropriate name and click Submit.
If you have any questions or enhancement requests, please contact us at [email protected].