Your content can be organized into Libraries. Although browsing through Libraries to locate a drawing isn’t as efficient as using Search, Libraries do allow you to control the content that individual users can access. To control which Libraries a User can access, please review the Library Access section.
Flatter Files also includes the ability to create Smart Libraries. Smart Libraries allow you to group together drawings that meet specific criteria. Drawings and documents can be included in multiple Smart Libraries if they match the criteria but items are only part of one regular Library. Every item must be included in one Library. By default, all uploaded items will be included into the Library that is selected in the Uploader Folder configuration.
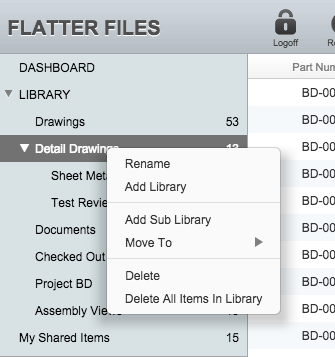
Libraries cannot be modified by Viewer User accounts. To modify a Library, right-click an existing Library. The right-click menu is shown in the image below. The menu includes multiple options which will be discussed in the sections below.
To add a new Library, click the “Add Library” option from the right-click menu. This will display a dialog for adding a new Library which is shown in the image below. The Add New Library dialog requires that you enter a name for the new Library. You then can select whether this Library should be considered a Drawing Library or a Document Library. The third option enables you to determine whether by default the Library should be visible to your existing users. Uncheck the option if you would like to hide this Library from everyone.
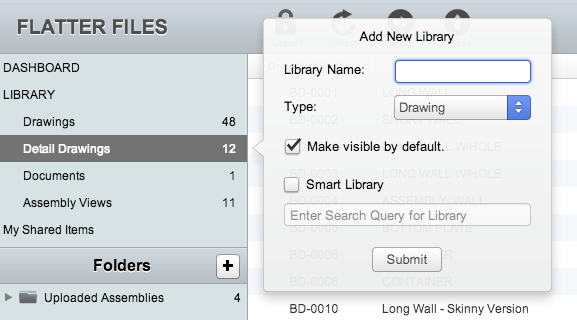
The last option when adding a new Library is to specify whether the Library will be a Smart Library. Please see the Smart Library section below for details regarding a Smart Library. Click Submit to finish creating the new Library. The new Library will be added to the list of Libraries. The regular Libraries are ordered based on the quantity of items contained within the Library.
Sub Libraries are fully functional Libraries that are simply located within another Library. This allows you to organize your content in a hierarchy if desired. Sub Libraries can be created in three ways. First you can simply right click any Library and select Add Sub Library. The same new Library dialog will be shown as discussed previously and all options are available. The only difference is that the new Library once it is created will be located within the Library that was right clicked.
The second option to create a Sub Library is to right click an existing Library, navigate to the Move To submenu and then select the desired Library to move the right clicked Library into. This will place the right clicked Library into the Library selected under the Move To submenu.
The last option to create a Sub Library is to simply drag an existing Library and drop it into another Library. The Library dragged will become a Sub Library of the Library that it is dropped into. Dragging a Library into another is shown in the image below.
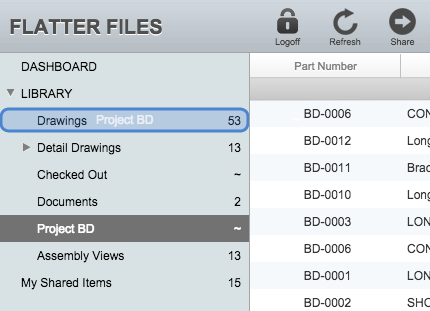
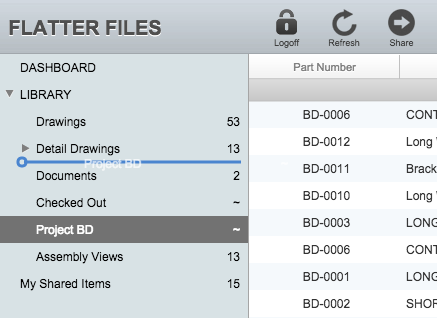
Libraries can be manually sorted into any order desired. To do so, simply drag and drop the Library into the desired location and then repeat the process until the order desired is obtained. The image below shows the the Library called Project BD being placed between the Detail Drawings Library and Documents Library.
A Smart Library does not permanently contain any items. Instead, it simply displays all of the items that match a search query. If you would like to create a Smart Library, enable this option when adding a Library and then enter the appropriate query. An example Smart Library might consist of a Library that contains all of the checked out items within your account. The appropriate query to enter for a checked out Library would be the following:
checkedout:yes
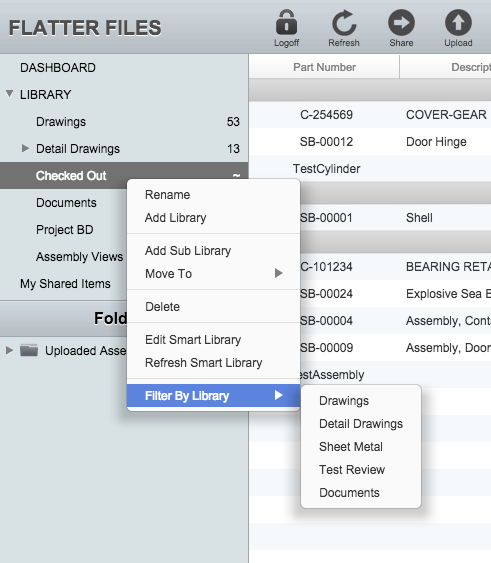
The Smart Libraries are positioned after the regular Libraries and are denoted with a ~ mark instead of the count of items since the count changes regularly. Right-clicking on a Smart Library will display three additional options to the right-click menu, Edit Smart Library, Refresh Smart Library, and Filter By Library. Edit Smart Library allows you to redefine the search query used to populate the contents of the Library. The Refresh Smart Library will refresh the contents to ensure the Library contents are current with any recent changes to the drawings.
Often the smart library will display items from multiple regular Libraries. To filter the Smart Library results by a regular Library select the appropriate Library from the Filter By Library sub menu. The Library filter can easily be cleared by right clicking again and selecting the option Clear Filter.
Your account includes two default Libraries. The default Libraries are called “Drawings” and “Documents”. These two Libraries can be renamed but they cannot be deleted. Other Libraries that you create, including Smart Libraries, can be deleted. To delete a Library, right-click the Library and select delete. A confirm delete window will appear. Click Yes to confirm that you would like to delete the Library.
To delete all of the items within a Library, there is a right-click option called “Delete All Items in Library”. Select the option and then confirm the deletion. At this point the server will process each item in the Library and delete it. This can take some time so initially the items will appear to still be there. Give it a few minutes and then click the refresh button at the top of the web application.
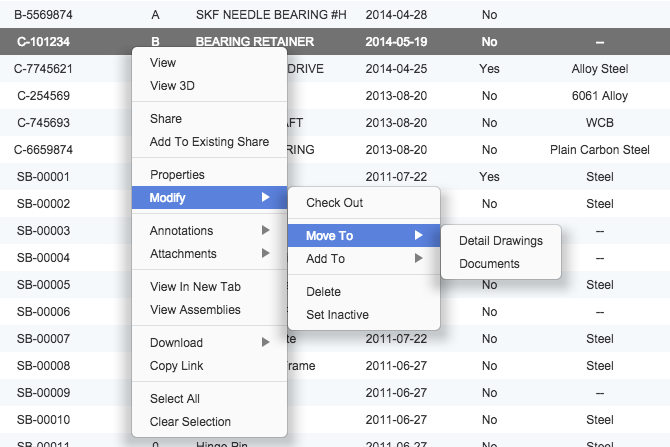
All Drawings and Documents must exist in one or more regular Libraries. This is determined based on the Library chosen in the Upload configuration. Once the item has been uploaded the only way to change the Library is manually. Right-click the item or items and select the “Modify” option and then the “Move To” option. This will display a submenu as shown in the image below. Click the Library that you would like to move the item into. It will then be removed from the current Library and placed in the new Library.
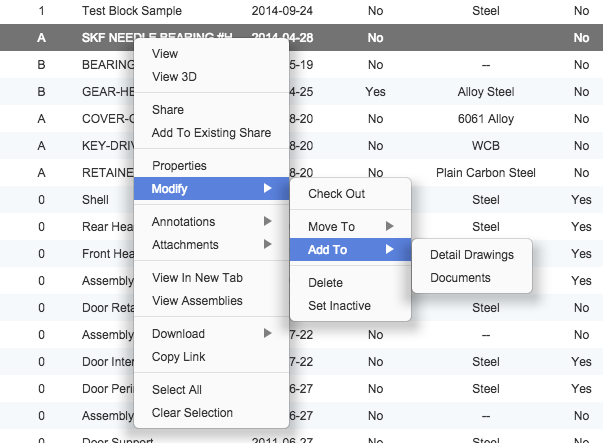
A drawing can’t be duplicated and it is always just stored as a single entity but it can be displayed within multiple Libraries. This is often desired if you decide to organize your Libraries to correspond to specific products since many times an item is reused across the different products. Adding an item to an additional Library is very simple. Simply right click the item or items and select the “Modify” option and then the “Add To” option. This will display a submenu as shown in the image below. Click the Library that you would like to add the item into. The item isn’t duplicated but instead will simply be displayed within both Libraries. If you delete the item, it will be removed from both Libraries since it no longer exists.
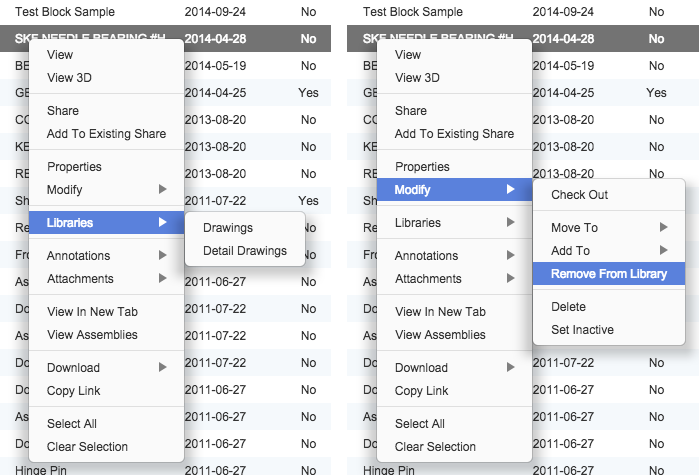
Once an item is contained within more than one Library two additions are made to the right click menu. First, a Libraries menu option is displayed as shown in the image below on the left. This option is displayed for all users. Selecting a Library will automatically display the item in the corresponding Library. In addition, a “Remove From Library” option is added to the Modify submenu as shown in the image below on the right. This will remove the item from the current Library that the item is being viewed from. Thus, when viewing the item within a search result this option is not available.