
Flatter Files is not a platform for enabling content creation. It is not a Dropbox or traditional PDM competitor. Flatter Files is a publishing platform for enabling access to content for everyone within your company. This includes non-technical staff such as supervisors, shop foremen, purchasing agents, etc. that regularly need to use drawings. To enable access to your content, Flatter Files needs a way to upload and keep your content up to date. To facilitate the automatic uploading of your content, the Flatter Files Uploader application is provided. In addition, specific files can be manually uploaded as discussed in the Manual Uploads section at the bottom of this page.
The Uploader application is used to process and upload your content to Flatter Files. It is a Windows desktop application that must be installed on at least one computer or server. The computer must have access to your content and have access to the appropriate application for each file type. The Uploader application processes each file using the appropriate application to create a PDF and obtain the property data. As the drawings are processed, the resulting PDF and property data is uploaded to Flatter Files. Optionally, the Uploader application can be configured to also generate various generic CAD formats for each drawing. Currently, the Uploader application supports the following applications and their primary drawing or document file type.
| CAD | Document | |
|---|---|---|
| SolidWorks | Word | Illustrator |
| Autodesk Inventor | Excel | Tiff |
| AutoCAD | PowerPoint | JPEG |
| Visio | Publisher | XML |
| DraftSight |
Please email [email protected] if you are considering Flatter Files and your software package is not supported.
Think of the Uploader application as your modern digital printer. It is configured to upload specific folders or an entire drive of content. It is not a sync application, as it does not modify your local drawing content in anyway.
The Uploader application can be downloaded at http://www.flatterfiles.com/uploader. Once downloaded and installed, the application will automatically check for and install updates as they become available.
Once the Uploader application is installed and opened, a dialog will appear asking for your login credentials. Enter your credentials. If successful and if this is the first time you have logged in, you will be presented with a welcome screen within the application. Click next and a dialog appears to configure your first upload folder. Skip down to the Upload Folder section to immediately configure the upload folder.
The Uploader app window can be closed and the app will remain running. This is because the app is considered a task bar only application and the menu can always be accessed in the task bar tray area, which is typically located in the bottom right. The icon shown in the tray area looks like a grey folder. Clicking on the grey folder icon will display the menu to control the Uploader application. The menu can also be accessed from within the main Uploader window by clicking on the grey folder at the bottom of the window.
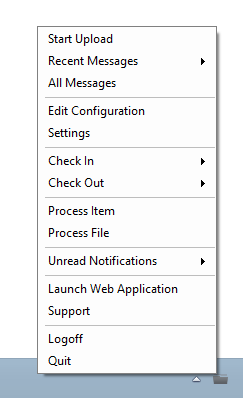
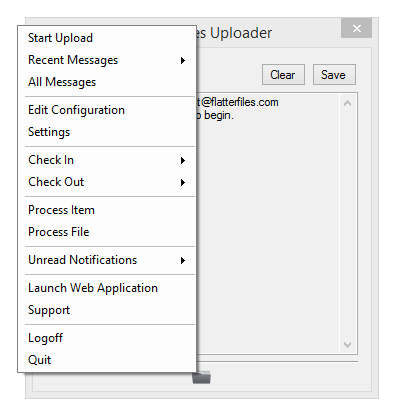
The first menu item is “Start Upload”. This will start the processing of the configured upload folders. An upload can occur on a timer interval or a specific time each day, but this first option allows you to begin an upload anytime. During the upload process, the Uploader will write messages to a log that can be viewed by selecting the “All Messages” option. The message logged contains information related to the upload process. The most recent messages can be viewed directly from within the menu using the “Recent Messages” option.
The configuration can be edited by clicking the “Edit Configuration > Folder List” option. Details regarding how to configure the uploader will be discussed in the next section. The “Settings” options will display application specific settings, which are discussed below in the Settings section.
The “Check In”, “Check Out” and “Unread Notification” options will be discussed in the Review Process section.
While typically you will want to perform a full upload so any item that needs updating will be uploaded, the “Process Item” and “Process File” options provide a way to upload individual drawings. The “Process Item” option allow you to search for and select an existing item on Flatter Files that will then be processed by the Uploader. The “Process File” allows you to select a specific file on your computer to process and upload if new. In both scenarios, the item or file must be located on your local computer within a configured upload folder.
The menu contains shortcuts to launch the web application as well as open this documentation in the users default browser. To logoff the Uploader application, select the “Logoff” option. Closing the main window will not quit the Uploader application. To quit the application select the “Quit” option.
The Uploader must be configured to perform uploads. You can configure what will be uploaded and how often the items should be checked for changes. To begin the configuration process, click the “Edit Configuration > Folder List” option in the Uploader menu. This will open the main window and display the currently configured Upload Folders. Below the list of Upload Folders are a row of buttons that allow you to add, edit, delete and copy Upload Folders. To perform an action on an existing Upload Folder, first select the Upload Folder and click the appropriate button.

If you have many folder configurations, you can filter the list by clicking the Filter button. This will allow you to enter text to filter the list of folders shown. In addition to Filtering, you can click the column title to sort the list by that particular column. A CSV file can also be created by clicking the export button. The CSV file will contain the primary properties of each folder configuration listed. The CSV file can easily be opened in Excel such that the settings for each folder can easily be compared.
Once you have configured folders for upload, you can start and upload at anytime by manually clicking “Start Upload.” However, it is typically more convenient to schedule the uploads to occur on a regular interval. Click the “Next” button at the bottom right of the window to display the schedule options. For specifics regarding the scheduling options, see the Schedule section below.
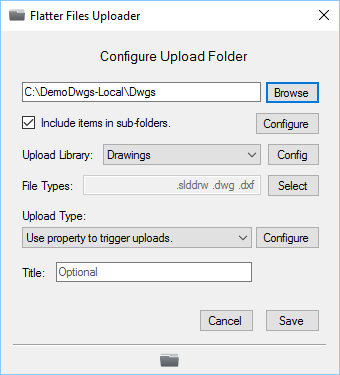
To upload content to Flatter Files, you must first configure an Upload Folder. An Upload Folder consists of a folder path on your computer that contains files that you would like to upload and configuration properties. The configuration properties will specify what will be uploaded. All settings configured below only apply to the single Upload Folder that is being created or edited. Thus, you may have one Upload Folder that has very different settings than another.
To configure an Upload Folder, first browse to the location of the folder. The next option determines whether the files in sub-folders should be included. Then select the initial Library that the files should be uploaded into. By default, Drawings and Documents Libraries exist. Additional libraries can be created within the web application and once files have been uploaded they can be moved from one library to another. See the Library section for more details regarding libraries.
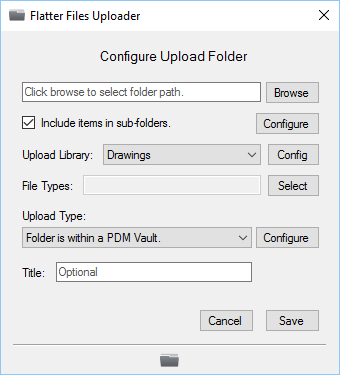
In addition to selecting a specific upload Library, the Uploader also supports matching the local folder structure. Instead of selecting a specific upload Library or Libraries, you instead set the Upload Library equal to Match Folder Structure. This setting will instruct the Uploader to automatically create the necessary Libraries to match to folder structure of the items being uploaded.
The Uploader application supports a specific list of file types. The configuration for the upload folder requires that you specify the file types that you want included in the upload. Click the select button and a new dialog will appear that allows you to select the file types. At a minimum, the Uploader will process the selected files and generate a PDF file which will be uploaded. Click the File Type Options button to display a new window showing various options. Various file types have specific options that can be shown by changing the drop down list to the file type options that you would like to edit.
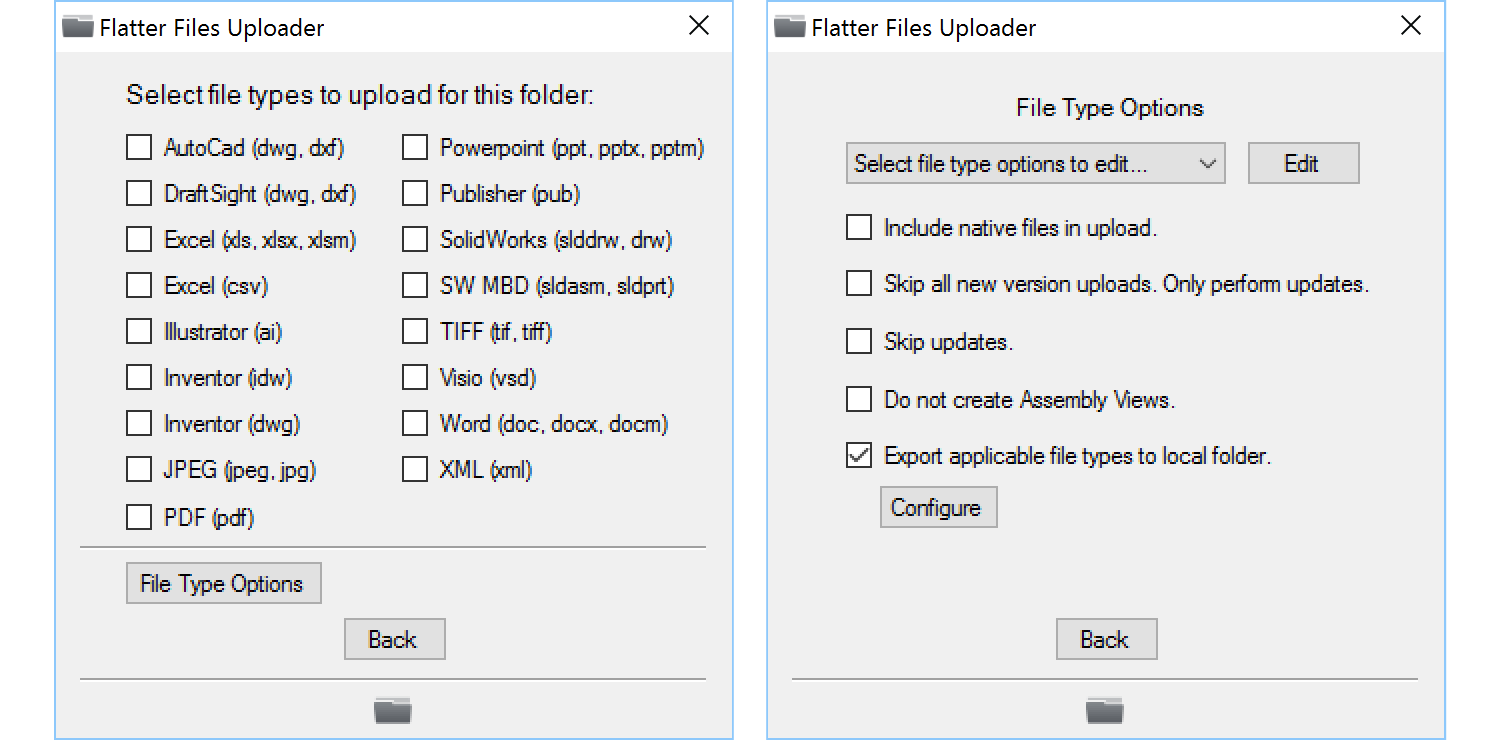
In addition to the file type specific options, there are a handful of options that apply to multiple file types. The first option is whether or not you would like to include the native file types in the Upload. The native file type is the source file that the Uploader processes to generate the PDF. The second option will designate this configuration to only update items that have already been uploaded. This setting is only useful if you have another Uploader installed on a separate machine that is doing the processing to generate the PDFs. Once the PDFs are generated then the second uploader with this option would be designated to upload the additional generic CAD exports. This allows you to speed up the Uploader that is generating PDFs since it doesn’t have to also generate the generic CAD exports. This third option is the opposite of the second option such that you designate the configuration to skip all updates to items. It will instead only upload new versions.
The fourth option that applies to multiple file types is the option to not create Assembly Views. If you are not using Assembly Views then it makes sense to enable this option. Doing so will speed up the uploading process since assembly hierarchies will no longer be processed.
Flatter Files includes an additional file type option that allows you to specify if you would like a copy of the files being uploaded to be saved in a local folder. Once you enable the option, then you must specify the file types to export and the folder to export them to. Keep in mind, only file types being uploaded to FF will be possible to save locally. Consider a scenario where you have configured native source DXF files to be uploaded and native source SOLIDWORKS files. In addition, you have selected SOLIDWORKS files to also have a DXF file uploaded. If you then entered DXF to be exported locally, then each native DXF file will be exported locally and each created DXF file from the SW source will be exported locally. This results in a DXF file for each item uploaded to Flatter Files. In addition, if you entered a STEP file to be exported locally but didn’t specify that the SW files should have a STEP file created then there won’t be any STEP files exported since none exist. To include the STEP files, follow the instructions described in the next section to enable uploading of the STEP CAD file type.
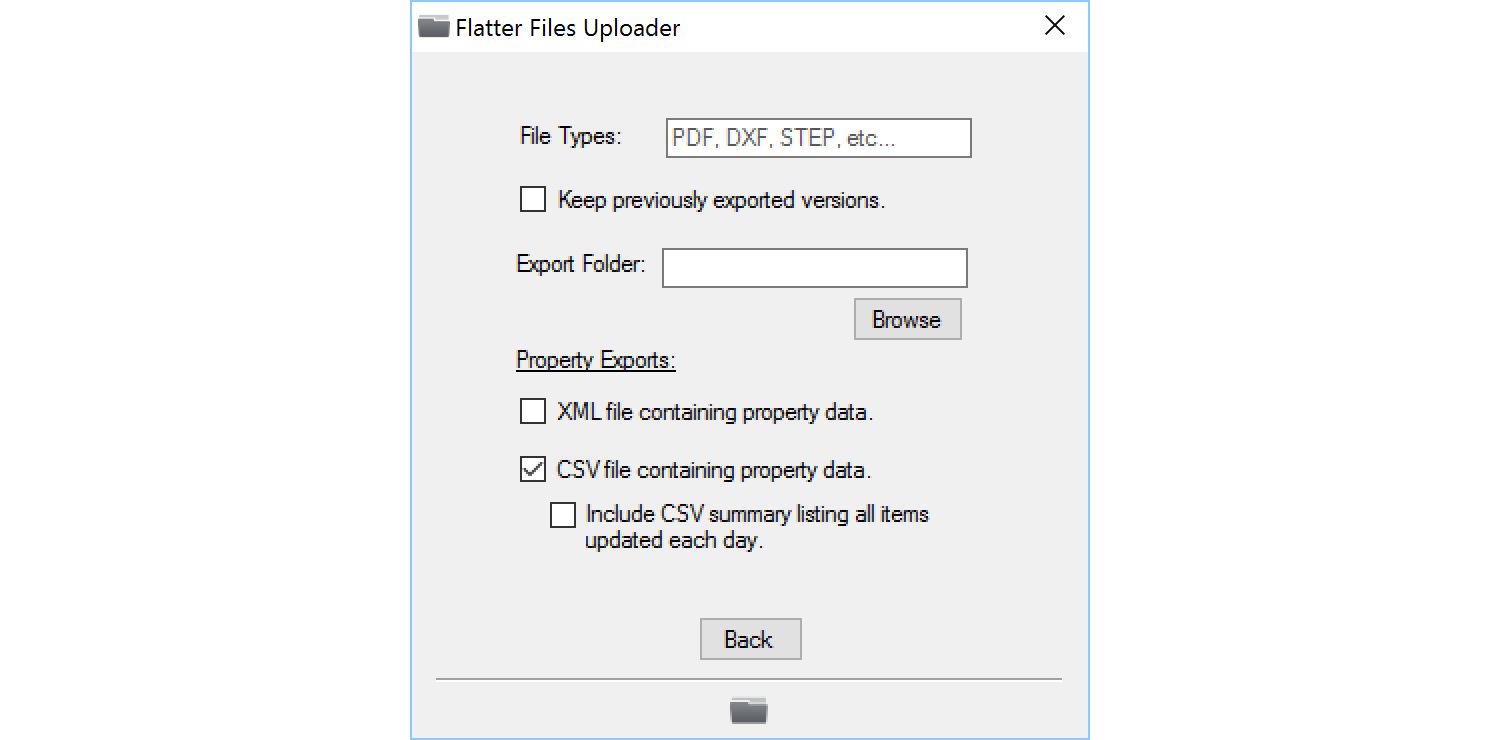
In addition to saving files created locally, the Uploader can also save a CSV or XML file locally that will contain all of the custom properties retrieved by the Uploader. When saving a CSV file locally, there is also an option to save a summary file of all changes that occur each day. These options to save property data locally can be very useful for integrating with other ERP or PLM systems.
Inventor and SolidWorks files include a set of specific options that can be edited which are shown in the image below. One of the unique benefits of Flatter Files is the ability to upload generic CAD file formats automatically that are easily accessible when viewing the drawing on Flatter Files. To select each generic CAD file to include for each drawing, click the Select button. This will display the image below. The most common exports are listed such as STEP, IGES, etc. In addition, for SolidWorks only Flatter Files can auto create and export a CSV file of the drawing BOM table.

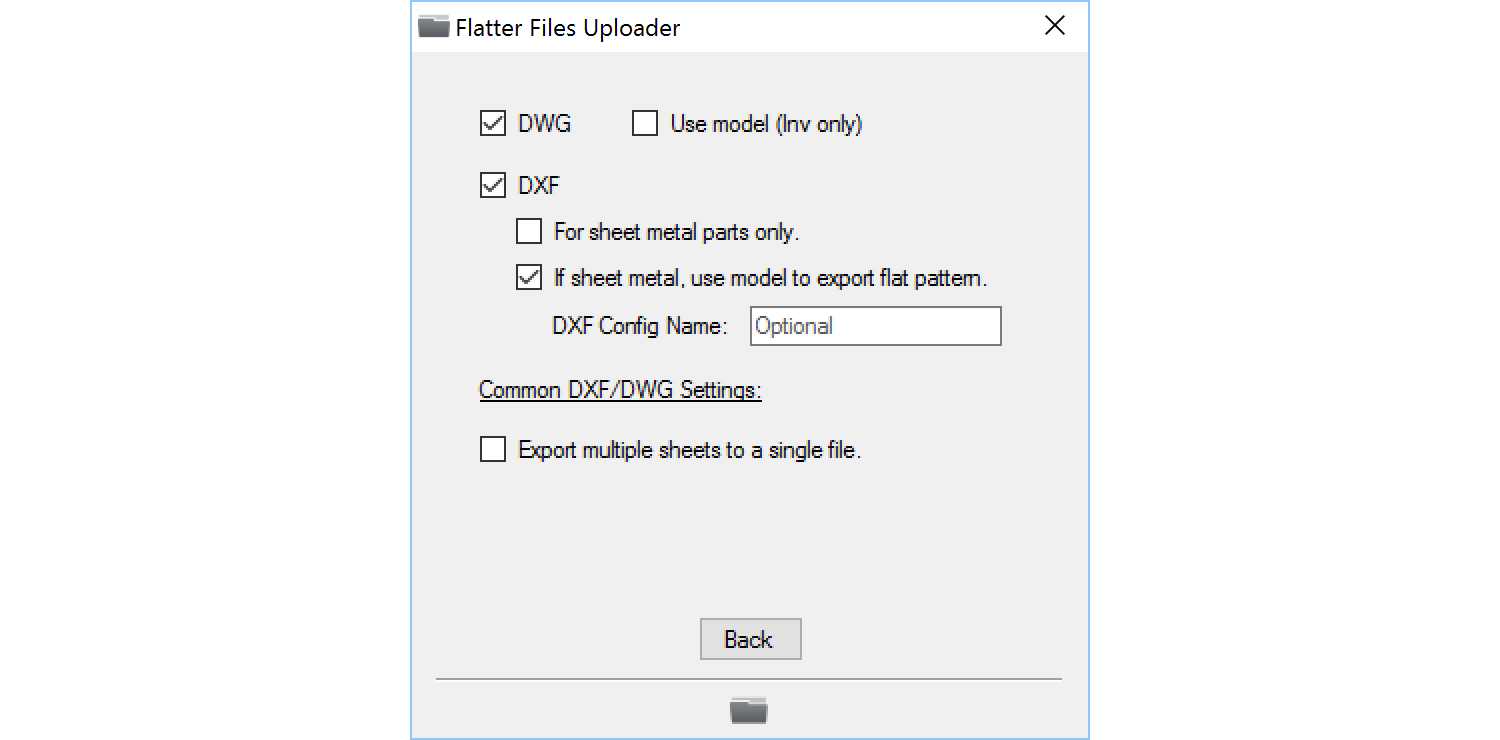
If you would like to export a DWG or DXF file from your SolidWorks or Inventor drawings, click the DWG/DXF Export button that is shown. Check the appropriate boxes to enable. DXF file creation can be limited to sheet metal parts only and if it is a sheet metal part then you can specify whether to use the model or the drawing to create the DXF flat pattern. If using the model, you can even specify a specific configuration name that should be used. For both DWG and DXF, you can select whether you want a single file created or individual files for each sheet.
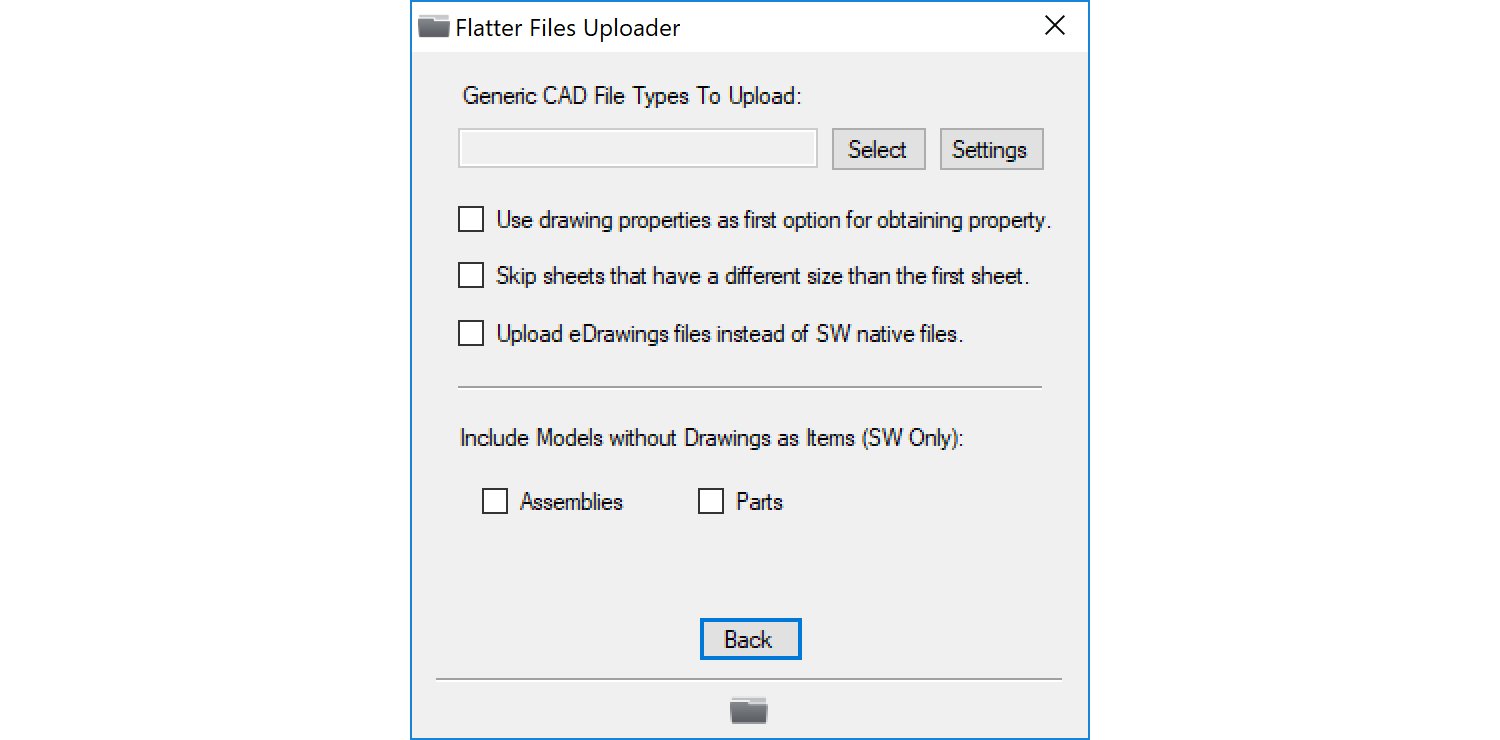
Below the selection of the generic CAD file types, there are a set of detailed options for your Inventor and SolidWorks files. The first option determines if you want the Uploader to check the drawing for the property first instead of the model file. If the property is not found in the drawing, the Uploader will then check the model. If this option is not checked, then the model is checked first and then the drawing. The second option allows you to specify if sheets should be skipped that have a different size from the first sheet. Some users create custom layouts for different sheet sizes for each drawing. For this scenario, you can skip these unique sizes by enabling this option.
By default if the model is greater than 20-MB then the generic CAD file formats are not created. If you would like to override this default and still have the Uploader generate and upload the generic CAD file then enable the third option. The fourth option when enabled will have the Uploader delete any hidden bodies before generating the generic CAD exports. If you would like the generic CAD models to be created from the exported part instead of the Assembly then enable the fifth option. The sixth option will update the display state of the model before exporting the generic CAD exports based on the display state used in the drawing views.
The seventh option allows you to designate that you would like the Uploader to create eDrawings files for each SolidWorks native file and Upload the eDrawing file as the native file instead of the SolidWorks file. If you plan to heavily use the ability to view your CAD models in eDrawings then this option will dramatically improve the performance of eDrawings since the eDrawing file will be opened instead of the SolidWorks native file. The eDrawings files that are created will contain the corresponding configurations that are included in the drawing either directly or contained within an Assembly in a drawing view. The previous four options will only be displayed if you have selected to Upload SolidWorks files and in the case of the eDrawing option you must also have selected to upload native files.
If your drawings references multiple configurations of the model, then the last option allows you to specify that you would like a generic CAD file created for each configuration. Once enabled, then you can specify if you only want to include configurations reference from within the drawing or include all configurations.
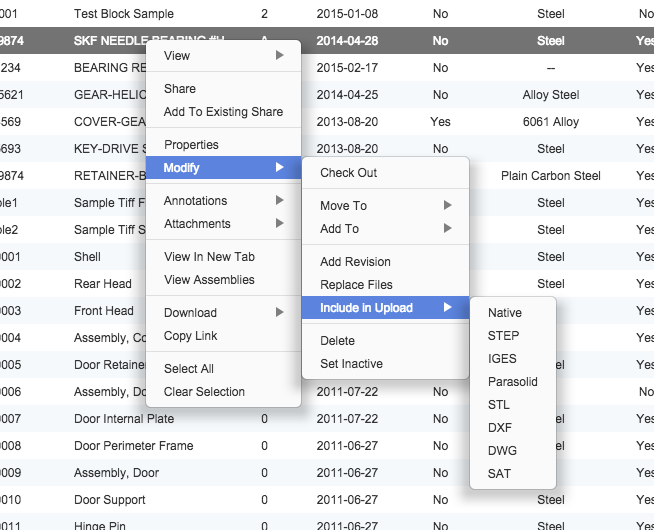
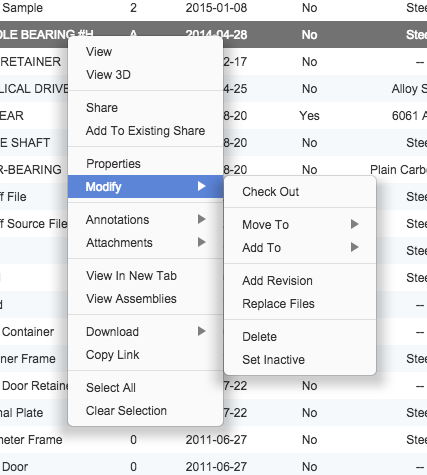
When a generic CAD file format is enabled, all files in the configured folder will have the generic CAD file type exported. Sometimes it might be desired to automatically create and upload a generic CAD file type for a specific file or files. To do this, locate the item on Flatter Files, right click on the item, navigate to the Modify submenu, navigate to the Include in Upload submenu, and then select the desired generic CAD file type that you would like automatically created and uploaded. The right click menu is shown in the image below.
AutoCAD and DraftSight files also include a set of specific options. These options are shown in the image below. The first option allows you to force the PDF to use Monochrome only such that it is black and white even if the DWG content contains color. The next option when enabled will delete all frozen layers before creating the exports. The third option will set the resulting PDF width to a fixed value. The fourth option allows you to specify the line weight. This will update all layers to use that specific line weight when creating the PDF. These first four options only apply to Draftsight files.
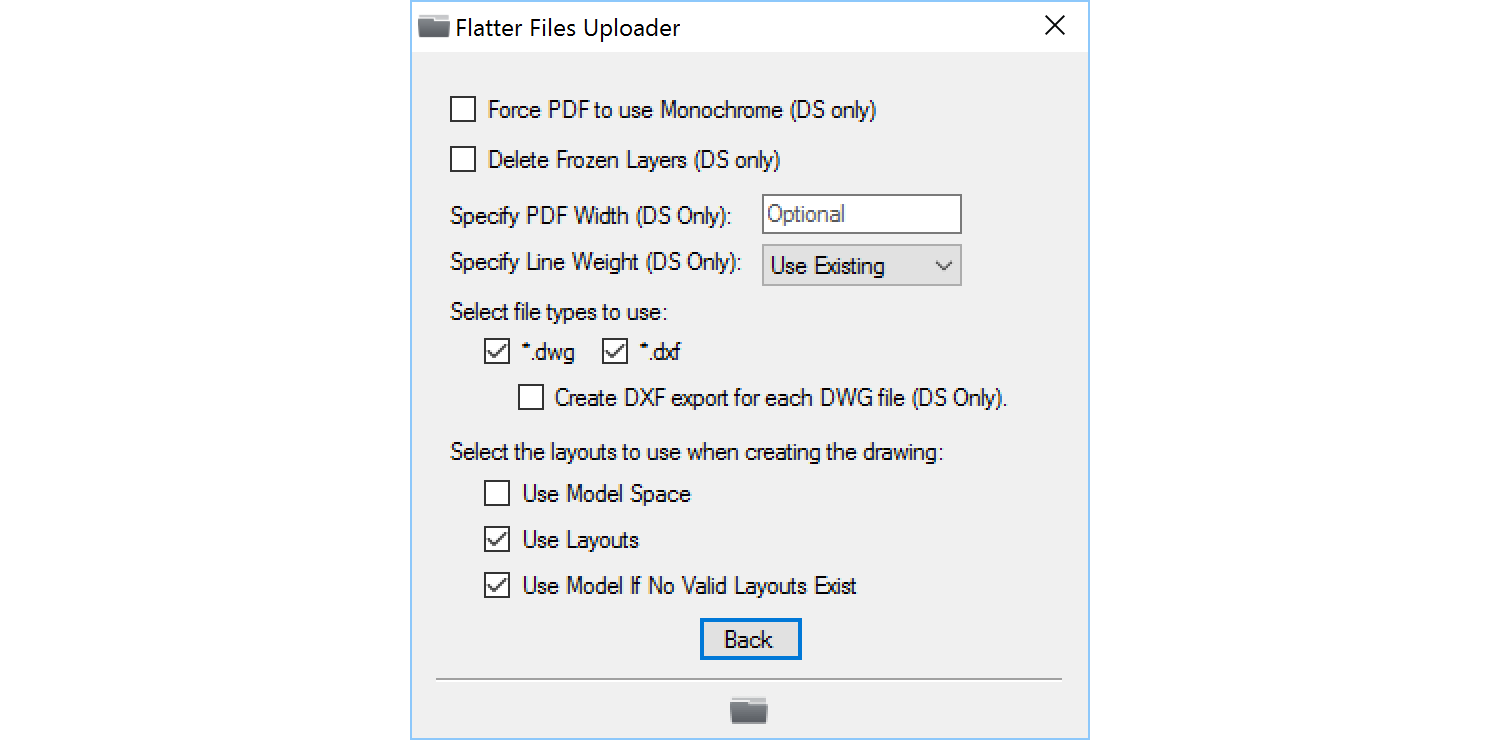
The next option allows you to determine if both DWG and DXF file formats should be included. In addition for DWG files using Draftsight for the conversion, there is a setting that will auto export and upload a DXF for each DWG file. The next option allows you to determine which layouts should be used.
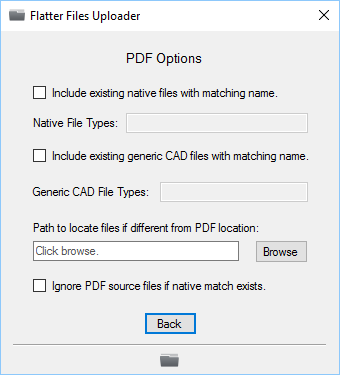
Flatter Files allows you to upload PDF files directly. When doing this, you can optionally include both native file formats as well as generic CAD formats. This is useful for old archive data, especially if you have switched to a different CAD software but have a bunch of old PDF files with corresponding native and/or generic CAD files. Uploading these additional files simply consist of configuring which file types you want to include for both the native and/or generic CAD files. The settings are shown in the image below. The file path setting allows you to specific a specific location for the files being included with the PDF. It is only necessary to select this location if the location is different than the PDF location.
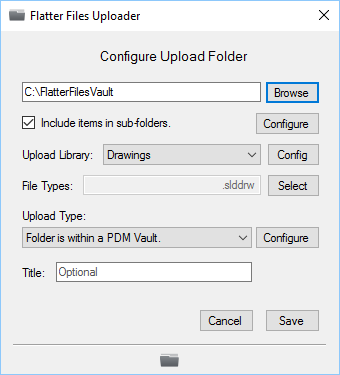
The Uploader application supports four upload types: Manual, PDM, Trigger, and File. The upload type is configured using the selection option as shown in the image below. The first upload type listed, Folder is within a PDM Vault, is specifically designed for SolidWorks PDM users or Autodesk Vault users. If you are integrating Flatter Files with SolidWorks PDM or Autodesk Vault, then select the option “Folder is within a PDM vault” and then click the configure button that appears. Details for integrating Flatter files with EPDM or Autodesk Vault are discussed in the PDM Integration section below.
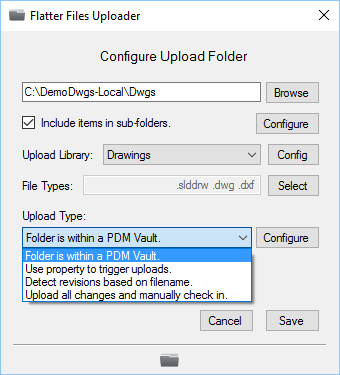
The second upload type, Use property to trigger uploads, can be used for both improving the Manual upload experience as well as allowing you to integrate Flatter Files with most PDM solutions. To enable the Trigger upload type, select the option “Use property to trigger uploads” and then click the configure button that appears. Details for configuring the Trigger are discussed in the Upload Trigger section.
The third upload type, Detect revisions based on filename, is designed to allow you to upload existing revisions based on a file naming convention. For example, if you have three revisions named NAME, NAME-rev1, and NAME-rev2 then all three will be uploaded as a single entity with two revisions. To add a new revision for this scenario you would simply add the file NAME-rev3. To enable this upload type, check the option “Detect revisions based on filename” and then click the configure button that appears. The configuration simply allows you to select whether you want to skip the review process or not.
The last option, Upload all changes and manually check in, will upload any files that have changed since the last upload. This upload option requires the use of a review process on Flatter Files. Files uploaded using the Manual option are not immediately available for viewing. To make them viewable, check the drawing in and approve the revision. This will release the drawing, create the revision and automatically display it when someone views the drawing. Details regarding the review process can be found in the Review Process section.
Configuring multiple Upload folders is very common. It allows you set specific settings for different types of content. To help designate which upload folder is which, you can set a title for each folder configuration. The title is optional.
To complete the configuration of the Upload Folder, click the “Save” button at the bottom right of the window. This will save the Upload Folder to the user account that is currently logged into the Uploader app. Thus, you can login to the Uploader app on another computer and your configuration settings will be there.
Multiple Upload Folders can be included. Simply click the Add button to keep adding additional Upload Folders. A quick way to add multiple Folder Locations that contain the same settings is to copy an existing Folder. Then select the new folder entry and click “Edit” to change the folder location.
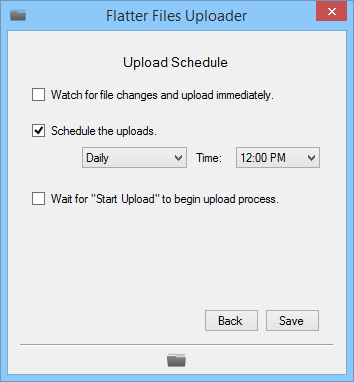
The Uploader application provides you with the ability to schedule uploads. Click on the Uploader menu and click “Edit Configuration”. Once you are viewing the Edit Configuration window, click the next button at the bottom right which will display the schedule options. There are three upload schedule options. The first option shown is the ability for the Uploader to constantly watch for file changes and immediately process the file when the file changes. This is not recommended if you are using the Manual upload process, especially if you are installing the Uploader application on a personal machine that is used for other purposes. The second option is to schedule the uploads to occur using some type of interval. The image below shows a daily interval, which then allows you to select the time for the daily upload. This option also allows you to select hourly, every 2 hours, 4 hours or 8 hours. The third and final option is to not schedule any uploads. This options requires you to select the “Start Upload” option from the menu anytime you want to perform an upload.
Before uploading your content to Flatter Files, the properties that will be uploaded need to be configured. This is a company account setting that will link specific Flatter Files properties to each CAD or Document application. A unique link for each application can be created for corresponding Flatter Files properties. Any application document property can be used including custom properties. Configuring the property link between Flatter Files to your files is important. Without the link, your property data may not be uploaded properly preventing your search results for being accurate. For details on creating the property links please view the Company Settings page.
To perform an upload, you can click the “Start Upload” option on the Uploader menu. This will start a full upload process where all of the enabled upload folders are processed for files that need uploading or updating. If you have scheduled uploads to occur on a regular interval, then an upload will occur based on that specified interval. If you are using the file watching schedule where anytime a file changes, it will be processed and uploaded if needed, then you must still first start the watching process by clicking “Start Upload.” This will first perform a complete upload and then begin watching for changes to any of the files.
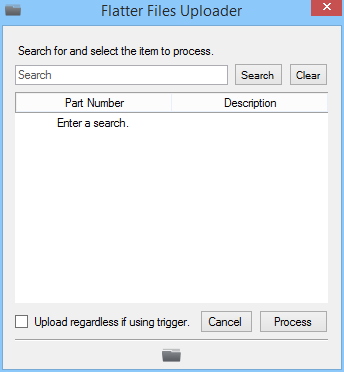
In addition to performing a full upload, the “Process Item” and “Process File” options provide a way to upload individual drawings. The “Process Item” option allows you to search for and select an existing item on Flatter Files that will then be processed by the Uploader. After clicking the “Process Item” option, the window shown in the image below. Enter a search query, select the item(s) and then click the Process button.
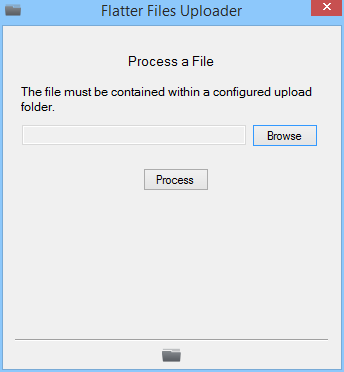
The “Process File” allows you to select a specific file on your computer to process and upload, if it is new. Selecting the “Process File” option will display the window shown in the image below. Click the Browse button to select the file you would like to upload. Once the file is selected, press the Process button. Both the “Process Item” and “Process File” options require that an Upload Folder has been configured that contains the item locally.
This section is specific for configuring the integration with SolidWorks Enterprise PDM or Autodesk Vault. If you would like to integrate Flatter Files with other PDM systems, see the Upload Trigger section below.
Integrating Flatter Files with EPDM or Autodesk Vault allows you to manage the creation process using PDM while providing access to your resulting content to everyone that needs to use the drawings. PDM is a content creation tool, while Flatter Files is a publishing platform. By combining the two, the end result is a complete digital workflow that improves efficiency throughout your organization.
The general purpose of the integration is to sync the drawing status from your PDM system to Flatter Files. Thus, as soon as the drawing is released within your PDM system, it is available to access on Flatter Files. When items are checked out or not in the released workflow in your PDM system, they will also be checked out on Flatter Files. Thus, items uploaded to Flatter Files using the PDM integration can not manually be checked in or reviewed on Flatter Files. This must occur within your PDM system. Flatter Files integrates as a read only application on top of your PDM system. Thus, no changes can be pushed back into your PDM system from Flatter Files.
A general discussion of the PDM integration settings is below. A step by step tutorial for getting started with SolidWorks EPDM and Autodesk Vault also exist.
Integrating with EPDM or Autodesk Vault requires the Uploader to be installed on the same computer that has a PDM client view installed, so the Uploader can access the vault. Integration with PDM consists of configuring an Upload Folder that will access the files located within the PDM vault. An example Upload Folder configuration is shown below. The folder path should be to a folder located within your PDM Vault or to the top level of the Vault as in the case of the example. The key option that makes this an PDM Upload Folder is that the “Folder is within a PDM Vault” option has been checked. Click the configure button next to this option.
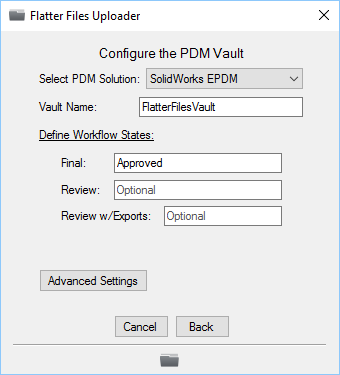
The configure button will display the PDM configuration options as shown in the image below. The Select PDM Solution option allows you to choose between SolidWorks EPDM and Autodesk Vault. Enter your Vault Name in the second option that is shown. This allows the Uploader to directly access the Vault.
PDM systems allow files to move through various states. Flatter Files is designed to upload the new revision once it is in the Final Workflow State as defined here. Typically the Final Workflow State is “Approved” or “Released” but it depends on the workflow you are using in your PDM system. You can include multiple Final Workflow states that should be treated as equivalent by simply separating each state with a comma.
The last option on this window is the optional Review Workflow State. This allows you to define a state that will be uploaded as a PDM Review Revision. A PDM Review Revision is not a normal revision. It is hidden from everyone unless the user is configured to have access to the PDM Review Revisions. This feature exists for the purpose of using Flatter Files to facilitate reviewers being able to access the item under review. The review cannot be accepted from within Flatter Files, you must first perform that task within PDM.
The PDM integration also provides a few advanced settings. Click the “Advanced Settings” button to display these options as shown in the image below. The first option allows the Workflow State to be matched even if it is only a partial match. For example, consider the scenario when you have three similar Final Workflow States consisting of Approved (Product), Approved (Process) and Approved (Admin). If you don’t have this option enabled then entering “Approved” as the final workflow state will not consider any of these states as being in the final state. But if you enable the option, all three will be considered in the final state.
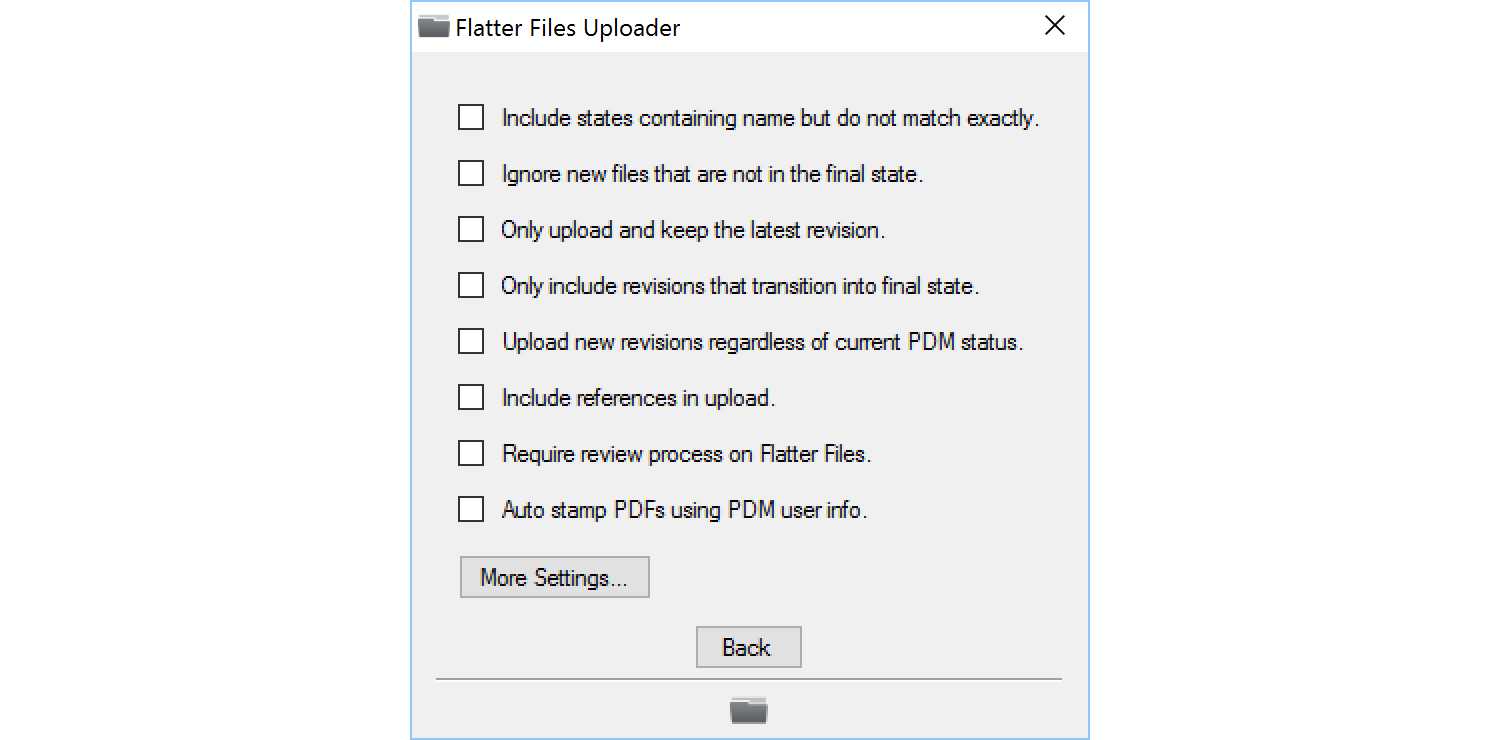
The second option, ignore new files that are not in the final state, allows you to determine how new files are handled. If the option is not enabled, an empty placeholder with the appropriate property data will be uploaded but the item will be checked out and not accessible since the item hasn’t actually been uploaded. If this option is enabled, then Flatter Files will not contain the new item. Thus, it will not appear in search results.
The third option, only upload and keep the latest revision, allows you to control what is kept on Flatter Files. If you would like all Revisions that have been created within your PDM system to also exist on Flatter Files, then do not enable this option. If you would like to keep only the latest revision, then enable this option. Keep in mind, that you can block access to previous revisions for viewer accounts so you can upload every revision but they can only access the current revision. Check out the Company Settings page for details.
The next option, only include revisions that transition into final state, allows you to ignore revisions that were created without using the designated final workflow state. Thus, if you create review or concept revisions they can easily be ignored if the workflow state that created the revision isn’t designated as your final workflow state.
The next option is to upload new revisions regardless of the PDM status. By default, new revisions are not uploaded unless the PDM state is both checked in and in a final workflow state. This is partially due to potential local conflicts that could occur if the uploader is installed on a computer that is also used to modify files and a file has a new revision even though it is being modified. Enabling this option is perfectly safe from causing conflicts if the uploader is installed on a dedicated machine.
If the next option, include references in upload, is enabled then any files that have been connected as a reference to the drawing or model within the drawing will also be uploaded with the item as a Reference. The reference or references in PDM are automatically zipped and uploaded by the Uploader. The drawing will then include a reference download option. Access to the reference can be controlled for both users and shared items.
The next option allows you to require a review of new revisions on Flatter Files before they are made accessible. Typically, your PDM system is used to facilitate a review process. Sometimes though you might want to add an additional review process using Flatter Files. In particular, this might be used if you want a customer or someone else outside of your organization to review the item. Once you enable the option to require a review, an additional Configure button will be displayed next to the option. The configuration of this setting allows you to specify the reviewer using three different methods. The first option is to select a reviewer for all of the items in the folder. The second option allows you to input a reviewer property in each drawing that designates the reviewer by either name or email address. The third option is to manually have to select the reviewer for each item once it has been uploaded.
Your PDFs can be stamped with a name and date value when conducting a review on Flatter Files. In addition, the stamp can be added automatically to your PDM items by enabling this option. Once enabled, a configure button will be displayed that allows you to determine the location of the stamp as well as whether it should be transparent and/or placed in the background.
Additional advanced PDM options are available by clicking the “More Settings…” button. These additional options are shown in the image below.
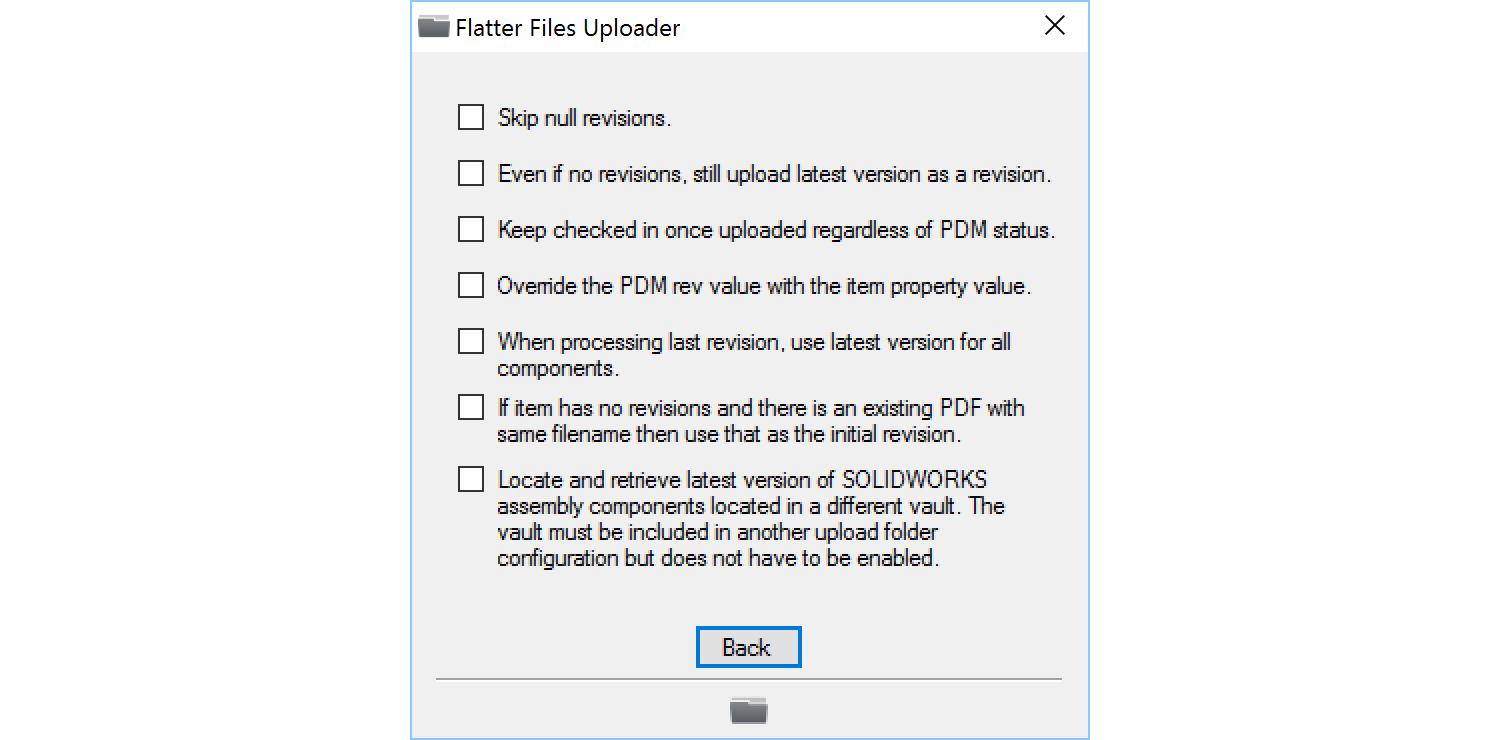
The first option on the second page of settings is to skip null revisions. This allows you to ignore revisions that don’t have a revision value assigned to them.
PDM automatically creates versions when the file is modified. To create a revision within PDM, it must move through a Workflow that has been created. If you are not using a Workflow and thus aren’t actually creating revisions (not recommended), then the second option will allow you to still use Flatter Files. When enabled, it will simply treat the last version as the released revision.
The next option allows you to break the connection between the checked out and released state on your PDM system and the checked out state on Flatter Files. If enabled, then checking out or changing the state in PDM will NOT check out the file on Flatter Files. Enabling this option is not recommended.
If the revision value in PDM does not match the revision property in the drawing and you would prefer to use the drawing property then you can enable the fourth option. The fifth option will force the Uploader to use the latest version for all drawing and model references instead of using the as built version. Typically this option is not recommended.
The sixth option will allow you to use an existing PDF initially for an item if it exists and the actual source file does not yet have a revision. This can be useful for companies that migrated from one PDM system to another and only have a PDF of the first revision.
The last option pertains to when a customer has multiple vaults and an assembly or drawing references an item in a different vault from where the assembly or drawing is located. This is a setting that hopefully is not needed since referencing items across different vaults is a very bad idea.
An Upload Trigger can be used in multiple ways. If you plan to use the built in review and notification process, then instead of uploading an item anytime a change occurs, it will only upload the drawing if specific property criteria is met. Once the upload occurs, you can still handle the normal review process within Flatter Files. If you are using a PDM system or other internal review process, configuring an Upload Trigger can create a seamless integration between Flatter Files and your PDM system such that as revisions are approved, they will automatically appear on Flatter Files.
The image below shows the interface for configuring a specific folder for upload. Toward the bottom of the interface you will see the option “Use property to trigger uploads”. By checking this option, a configure button is displayed as shown.
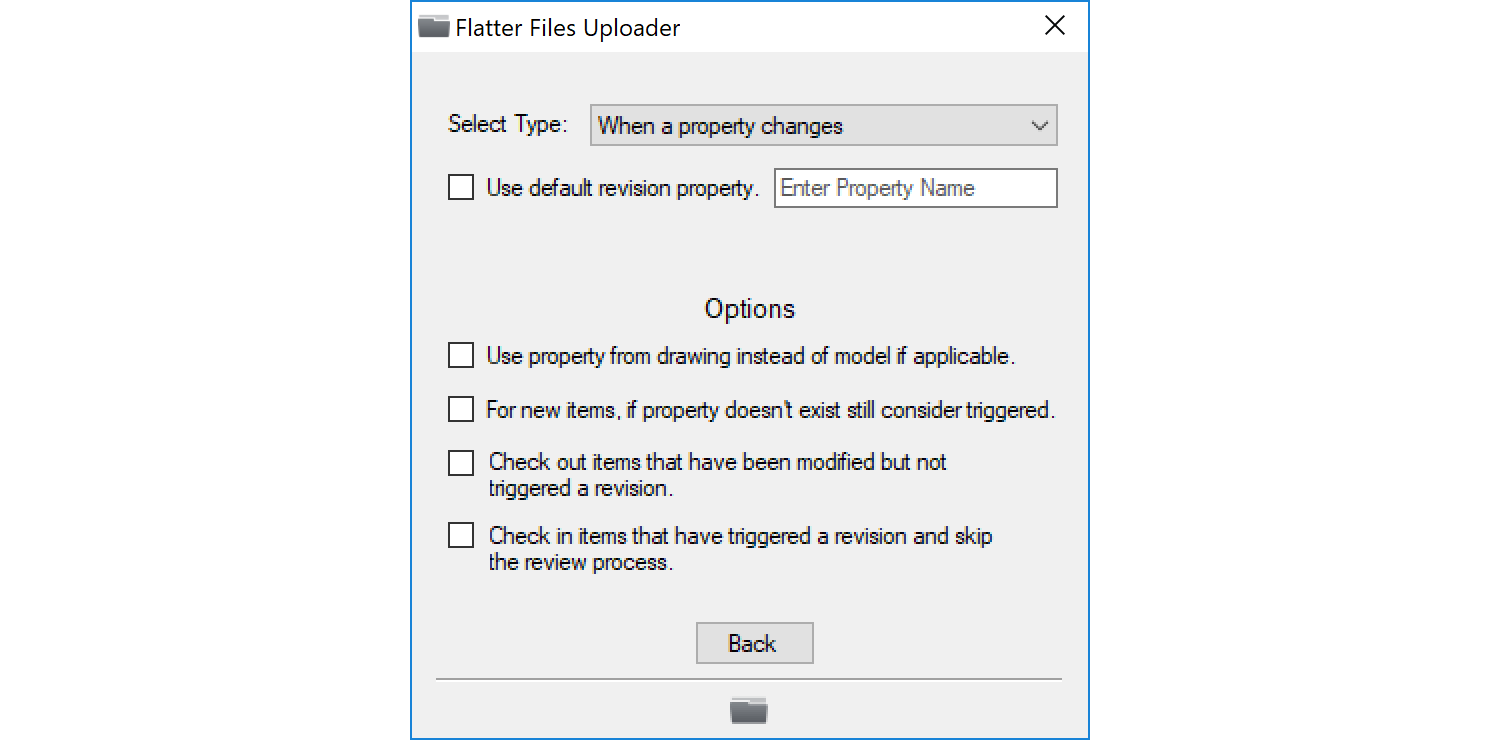
Clicking the configure button will display the interface shown in the image below. The first option is to select the type of Upload Trigger. The first and default trigger type is to perform an upload anytime a specific property changes. Typically this would be a revision property or something similar that is only modified when the new drawing is ready to be uploaded. For example, if the revision drawing property is equal to A and you modify the drawing but don’t change the revision property then it isn’t uploaded. Once you increment the revision property from A to B, the drawing will then be uploaded.
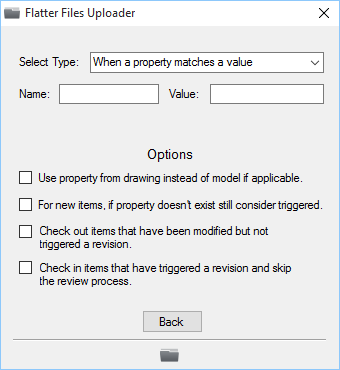
The second type of Upload Trigger requires a property to be equal to a specific value. Thus, an upload will only occur if the drawing has been modified and a specific property is equal to a specific value. The image below shows the required configuration for this type of trigger. As you can can see, enter the name of the property that you want to use and the value that it should match to trigger the upload.
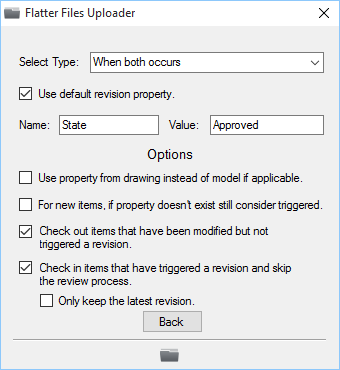
The third and final Upload Trigger type combines both the first and second such that a property must have changed and a different property must be equal to a specific value. The configuration for this trigger type is shown in the image below with example inputs for the property name and value.
All three trigger types described above have a few common options that also must be configured. The first option only applies to Inventor and SolidWorks drawings and pertains to whether the property data should be obtained from the drawing or the model. If you use properties from the drawing instead of the model, then this option should be checked. The second option configures how to handle new items that don’t yet have a valid value for the upload trigger property. If you check the option then it will be considered triggered even if the property doesn’t exist.
The third option is checked by default and allows the Uploader to automatically check out the item if you have modified it locally but have yet to trigger an upload. Thus, you are currently working on the item but it isn’t complete. The fourth option is typically only used if you are using a PDM or internal review system, which includes a review process such that you want to completely skip the Flatter Files review process. Basically, the Upload Trigger becomes a Revision Trigger. As soon as the trigger is met, a new revision is automatically uploaded and created on Flatter Files.
If you use the Manual upload type such that you don’t configure an upload trigger, then performing an Upload will upload all of the files that have been modified since the previous upload and check those items out. Once you are ready for the item to be reviewed, you check in the item and select a reviewer. Once the reviewer approves the drawing, the new revision is created and anyone that accesses the drawing will see the new revision. The downside to this is that the current version for all modified drawings is uploaded every time an upload is performed even for drawings that have been modified but are not ready for submittal. This slows down the upload process. By configuring an upload trigger, you have complete control over when the upload occurs for each item. An item can still be checked out as soon as you modify the drawing, but uploads will not occur until you modify the property data. This saves you time and resources.
There are hundreds, if not thousands, of existing PDM type software solutions for collaboration and/or review processes and simple custom review processes that may not even include specific software. By configuring an upload trigger, you can seamlessly connect any PDM type software or internal review process to Flatter Files, which can save time since it will automate the connection to Flatter Files.
Many companies create new filenames when they create revisions. Thus, they end up with multiple files for each item each with a revision value appended to the end of it. Flatter Files offers the upload option to automatically detect the revisions based on the filename for this scenario. The image below shows the corresponding options that can be configured. The first option allows you to enter the delimiter that is used to append the revision value. Examples are shown toward the bottom of the configuration window. If you do not use a delimiter and instead simply append a value then leave the delimiter value blank. The second option, allows you to specify if the revision label used should simply be the appended rev value or if the rev property value of the item should be used instead.
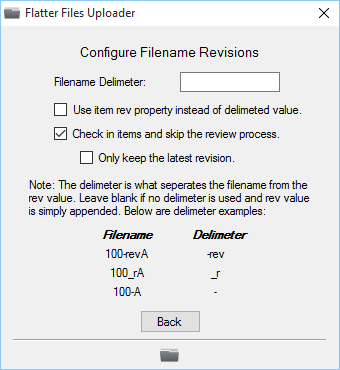
If you do not need to conduct a review process on Flatter Files due to already having an internal review process, then enable the option to check in items and skip the review process. If you enable this option, then you also have the option to only keep the latest revision on Flatter Files.
The Uploader contains multiple application settings. These settings are shown in the image below. The first option if enabled will send the upload messages to the server for viewing within the web application. In addition, if an error occurs the user that is logged into the uploader will automatically receive an email notification.
The second and third options are self explanatory. The fourth option allows you to turn on debug mode. Debug mode will output additional messages to the “All Messages” window which will significantly slow down the upload process. The messages are for sending to Flatter Files when an issue is occurring with the Uploader on your system. Keep in mind that these additional messages will dramatically slow the Upload process down. Thus, this option is typically only used for troubleshooting specific items.
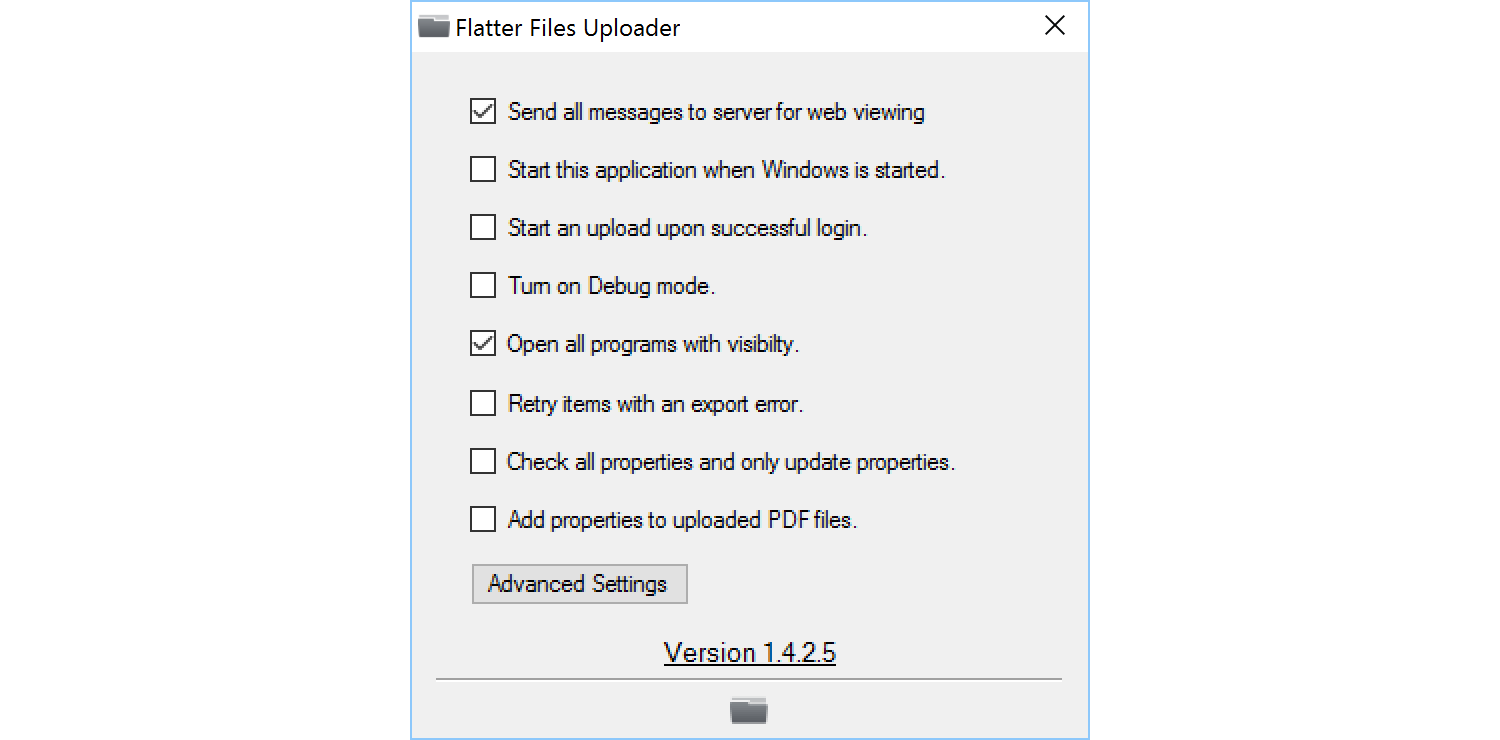
By default, unless the CAD or document application is already open, the Uploader will connect to the application in the background such that the program is not visible. Sometimes the CAD or document application will output PDFs that are missing data when the program is not visible. This is a bug in the application and something that the Uploader cannot fix. Therefore, the fifth option allows you to force all programs that the Uploader connects to to be opened visibly during the upload. For SOLIDWORKS in particular it is highly advised to keep this setting enabled.
The next option allows you to force the Uploader to retry all items that have had an export error occur. Typically when a STEP or other generic CAD file cannot be created the item is marked as having an export error and the export is not attempted again until a new version or revision is created. This setting will simply retry all of those exports that caused an error.
The seventh option forces the uploader to check all properties when checking for changes to the drawing. This can slow down the processing of the files and isn’t needed unless a property setting has been changed since the last time the items were uploaded. The last option on this settings page will allow you to embed the custom properties from the source file into the PDF that is uploaded to Flatter Files.
Additional settings can be accessed by clicking the Advanced Settings button. The additional settings are discussed in the next section.
The first advanced setting shown in the image below allows you to designate this particular uploader installation as only being used for settings modifications. Thus, you can log into the Uploader with the same account that is performing the uploads on another installation and adjust the folder configuration settings from this installation. For Uploader running on servers, this can be a useful mechanism for an admin to access the settings without have to log into the server.
The next option is only relevant if you are using multiple computers with the Uploader installed. When an item is uploaded, the computer’s name that performed the upload is added as property data for the item. This allows the uploader to determine if any files on Flatter Files no longer exist locally. When they no longer exist locally, the Uploader will ask the user if they want to delete the files from Flatter Files after the upload is complete. This setting will keep the computer name up to date if it changes even if the file doesn’t need uploading otherwise. This can also slow down the upload process.
The third option should be enabled for larger PDM vaults since it should help improve performance of checking for changes in the vault.
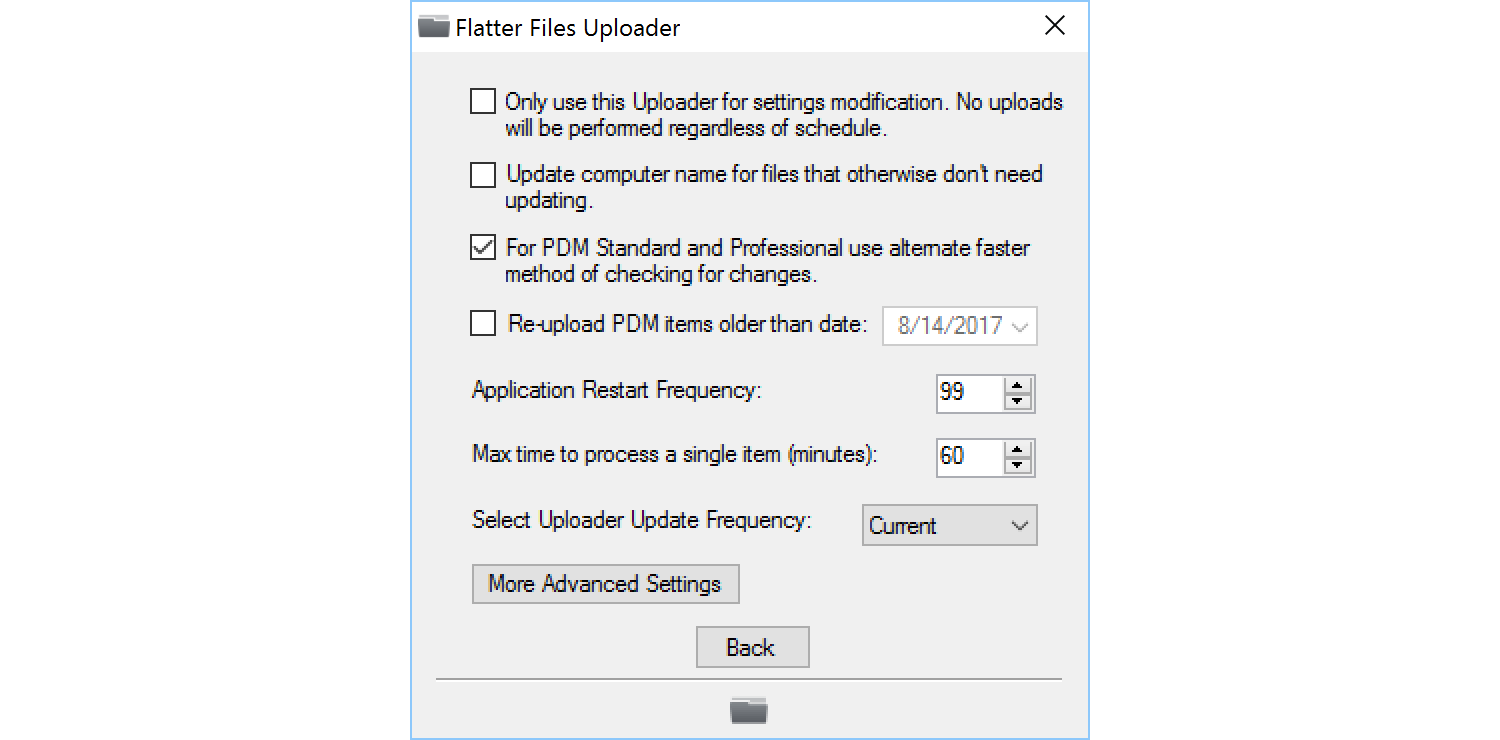
The next option allows you to force the Uploader to re-upload all PDM items older than a date that you specify. The date used for comparison purposes is the date that the item was last uploaded to Flatter Files not the revision date. Thus, this setting is useful if you have uploaded many items previously and then at some point made a change to the source files application settings that impacts the resulting PDF or other exports that were uploaded to Flatter Files.
Many source file applications such as SOLIDWORKS are not really designed to be used to batch process your files. Thus, over time as a large quantify of items are uploaded performance of the source file application can degrade. To help mitigate this issue the Uploader will automatically restart the source file application. By default the restart will occur every 99 files but this can be lower based on your preference. Obviously the average size of the files being processed will impact what this value should be set to for best performance. If the majority of your files are very large assemblies then I would recommend a value as a low as 10.
Source file applications also can randomly freeze. This is very problematic for the Uploader since the source file application will stop responding to all commands sent to it. To help mitigate these scenarios, the Uploader monitors how long an item is taking to process and if it takes longer than a designated amount of time the Uploader will terminate the processing and move on to the next item after restarting the source file application. By default, the max processing time setting is set to 60 minutes. With the setting shown above you change this maximum to based on your preference. Keep in mind, processing very large assembly drawings can take a lot of time so make sure you don’t set this time to be shorter than the time required to process your largest assembly drawings.
The last setting on this page allows you control the update frequency of the Uploader. There are three options: Current, Beta, Weekly. By default, this setting is set to Current. The Beta version of the Uploader is typically first updated with new features before the Current release is updated. Sometimes critical fixes are sent to both the Current and Beta versions at this same time. Often times if you ask for an enhancement that requires an Uploader update, we will ask you to switch to the Beta version to ensure it is working correctly for your usage before we roll the enhancement out to all of our customers. Once you have installed the beta version, you can immediately switch the update frequency back to Current and the beta you installed will remain installed. You will just not receive future beta versions. Setting the update frequency to Weekly simply means that you will be updated to the Current version of the Uploader approximately once per week.
Additional settings can be accessed by clicking the More Advanced Settings button. The additional settings are discussed in the next section.
The first setting on the More Advanced Settings page is very unique. If you are a large organization and interested in using the Uploader application but not the full Flatter Files cloud service then you can setup your own local database for sync and storage. This is quite complicated and will require detail implementation discussions. Please contact us if you would like to discuss this option.
A detail discussion of the next two settings shown are discussed at length in this page titled Scheduled vs Full Uploads.
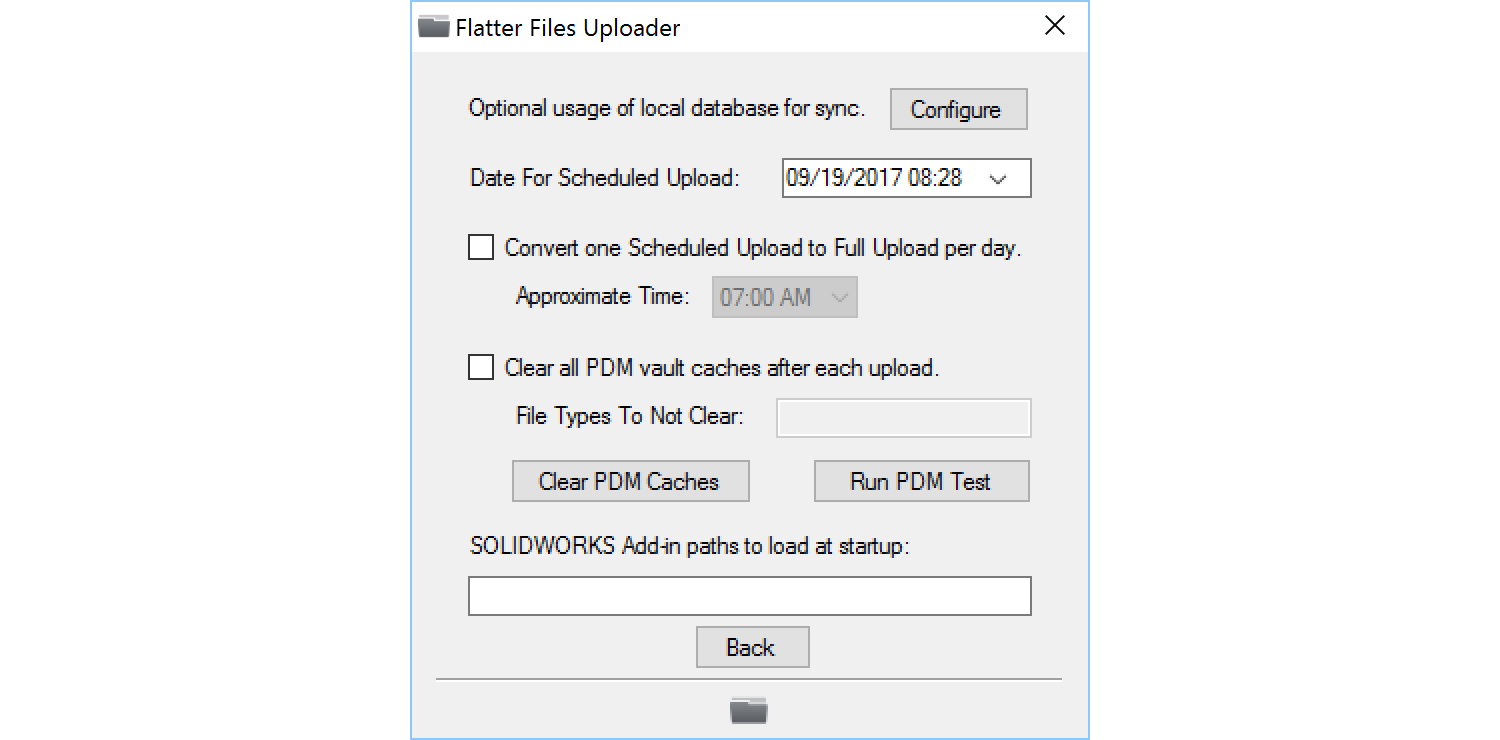
If you are using a PDM system then the next setting will allow you to automatically clear the local cache at the end of each upload. This is useful if your PDM vault is very large and the machine running the Uploader does not have enough space. Once enabled you can specify template files or other file types that the Uploader should skip when clearing the cache. In addition, there is a button to manually clear the cache at any point.
The last setting allows you to specify the path to specific add-ins that you would like the Uploader to load into SOLIDWORKS before processing any files. Regardless of your add-in settings, SOLIDWORKS will not automatically load any add-ins when the Uploader opens an instance of SOLIDWORKS. Thus, if the add-in is necessary to produce the correct file exports then you must specify the local path to the add-in.
Flatter Files supports manual file uploads from within the Web App. You can use the manual upload option to perform three types of uploads. The first upload type is to upload PDF files as new items. The second upload type allows you to upload a PDF as a new revision and only applies to items that are not connected to a PDM system. The third upload type provides an interface for replacing any file contained within the item or adding a new file type to the item. Each upload type along with all of the options are discussed below.
To upload an item to Flatter Files click the Upload button at the top of the Web App. If no items were selected then the only option is to upload new items. Only PDF files can be uploaded as new items. The new item file upload dialog is shown below.
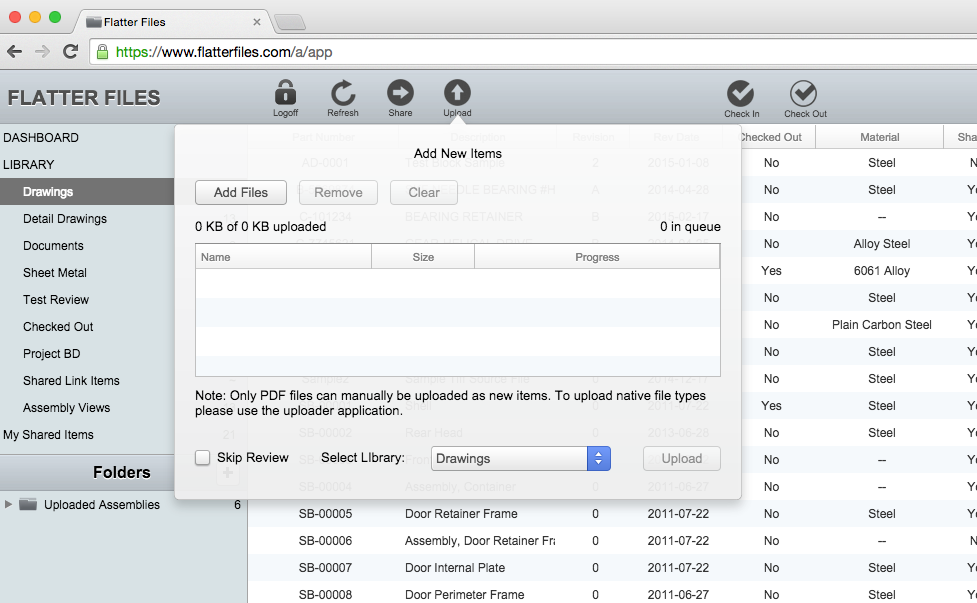
Click Add Files to select the files you would like to upload. In addition, you can optionally drag and drop files from your computer into the File Upload table shown. When uploading new items, there are two additional options. The first option at the bottom left of the dialog allows you to skip the review process. The second option allows you to select the initial library that the item will be uploaded to.
Once the PDFs have been added and you have configured the two settings appropriately, click Upload to start the upload process. The dialog will show a progress bar as the upload progresses. Once all files have been uploaded the dialog will automatically be dismissed and a notification indicating the upload is complete will be displayed. Shortly after the new items have been uploaded they will appear in the corresponding library.
In addition to uploading new items, you can also add a revision to an existing item as well as replace files for an item. If you initially select an item and then click the upload button the upload dialog will appear with a new option at the top right that will initially have Add Revision shown. This is shown in the image below.
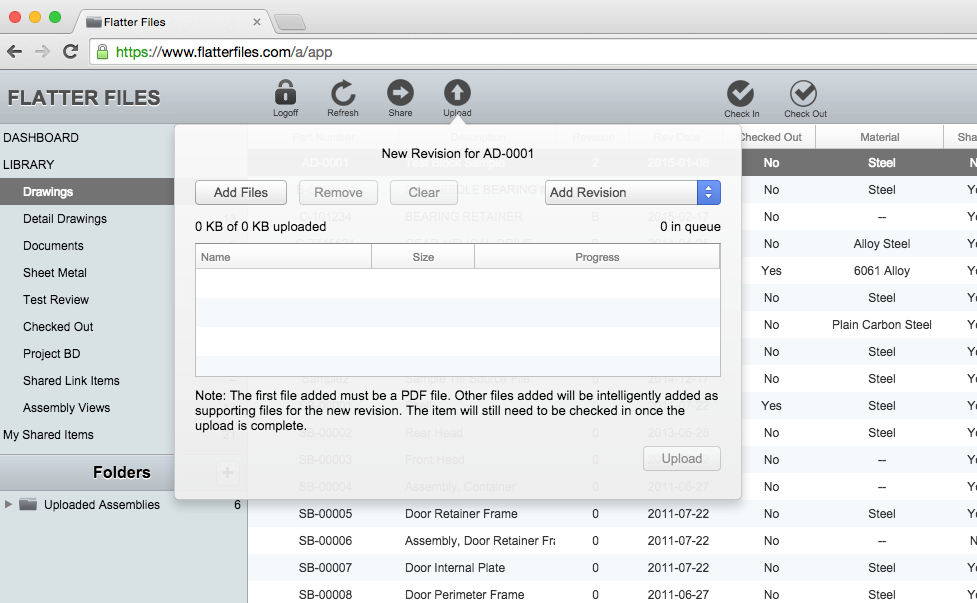
Click the Add Revision input to change the upload type to New Items or Replace Files instead of Add Revision. In addition, you can right click on the existing item, navigate to Modify, and then select either Add Revision or Replace Files as shown in the image below.
If the existing item was uploaded using the Uploader application with PDM integration, the Add Revision option will not be available since revisions can only be added from within your PDM system.
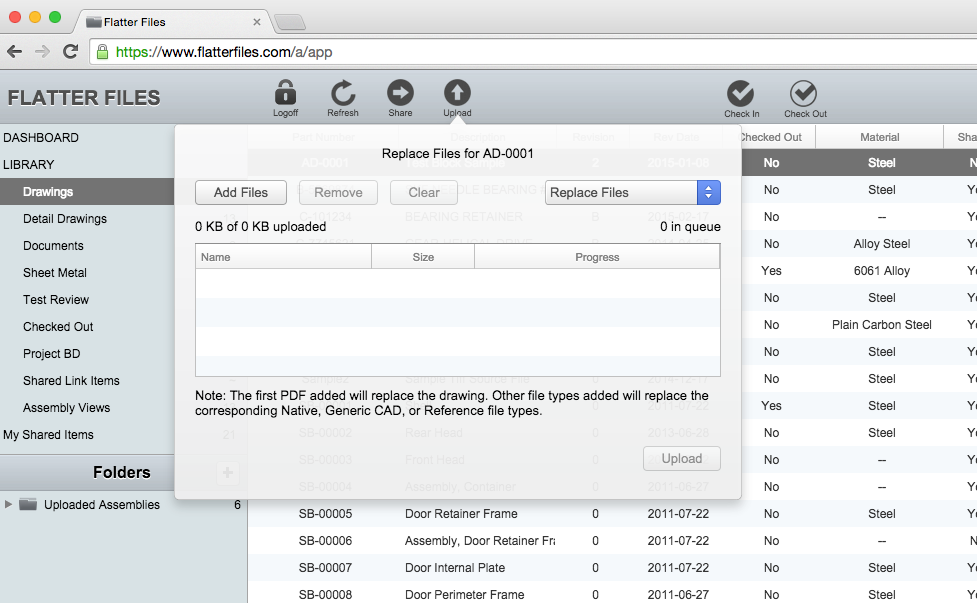
The image below shows the same upload dialog for when Replace Files is selected as the upload type.
When manually adding a revision, the first item added to the upload queue must be a PDF file. This first PDF will be used to create the revision. Additional file types such as Native of or Generic CAD files types can also be included and will be added to the revision.
The Replace Files upload type allows you to upload any file type and replace the existing file that has been uploaded. If a specific file type doesn’t exist yet for the item then it will simply be added to the item. Replace files is typically used when the automatically generated file by the uploader needs to be modified for distribution purposes or to correct an issue. For example, consider the scenario where you want to include STEP files for all of your SolidWorks files and you have configured the Uploader to automatically generate the STEP file but a specific STEP file contains information that you want to remove. For this scenario, simply manually create the STEP file you want to distribute for the item, then use the Replace Files option to upload the STEP file. This will replace the auto generated STEP file with your manually created STEP file. When users then access the item in Flatter Files, if they choose to download the STEP file they will receive the correct STEP file that you manually created and uploaded.
The Replace files can also be used to upload multiple files of the same file type. For example, if you want an item to contain three STEP files, then all three must be included in the same manual upload. Once on the server, the three files will be combined into a single zip file that can be downloaded. If they are not included in the same manual upload then the three files will replace each other as they are added.