SolidWorks Workgroup PDM Tutorial
Flatter Files is designed to work with or without a PDM system. Flatter Files makes PDM systems better by enabling access to your content to everyone. This tutorial will describe the typical setup for using Flatter Files with SolidWorks Workgroup PDM. It will assume that only SolidWorks files are being uploaded but additional file types such as AutoCAD could also easily be supported.
Prerequisites:
- SolidWorks Workgroup PDM installed and functioning.
- Access to a computer that has direct access to the Workgroup PDM Vault data.
- SolidWorks installed onto the computer with a valid license.
1. Determine Location of Vault Data And Verify Setting
Due to the nature of Workgroup PDM, the Uploader application needs direct access to the vault data. Thus, you can either install SolidWorks and the Uploader application directly onto the server that hosts the Workgroup PDM vault or use another computer on your network that has direct file access to the vault data.
Here are the steps to determine the location of your Vault Data.
- Open the application “SolidWorks Workgroup PDM VaultAdmin.”
- Login to the application when prompted.
- Click the Vault Management Tab.
- The Vault Management tab is shown in the image below. The first setting at the top left of the tab view displays the Vault Computer and the second setting shows the Root Directory. The Root Directory is the directory that the vault data is stored in. This is the folder location that the Uploader will need to be able to access.
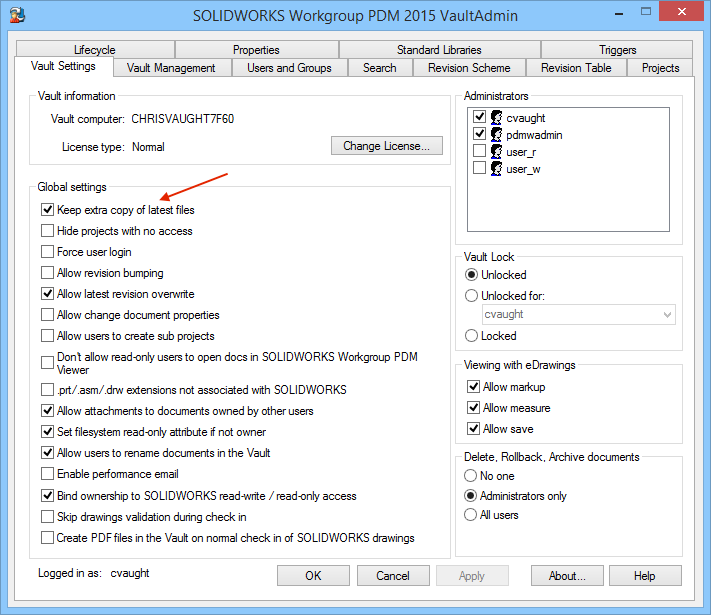
Integration with Workgroup PDM does require that your Vault have one specific setting. The setting “Keep extra copy of latest files” must be enabled. The following steps will help you ensure this setting is enabled.
- The application “SolidWorks Workgroup PDM VaultAdmin” should still be open from previous step. If not, please open this application and login.
- Click the Vault Settings Tab.
- Under Global Settings the first option is “Keep extra copy of latest files.”
- Ensure this setting is checked.
2. Install Flatter Files Uploader
Flatter Files works by locally processing your CAD files using your version of SolidWorks and then uploading the resulting data to the Flatter Files Cloud. To do this, you install the Flatter Files Uploader application onto the computer you plan to use.
- On the computer you plan to use, click here to download the installer.
- Double click the installer to install the application.
- Follow the installation instructions. Once finished the application should automatically open.
- If the computer you are using does not have SolidWorks, install SolidWorks onto the machine.
3. Login and Display Configure Upload Folder
The Uploader application requires a user account to login. All configuration data for the Uploader will be saved to the users account. Once logged in, the steps below will result in displaying the window used to configure an Upload Folder.
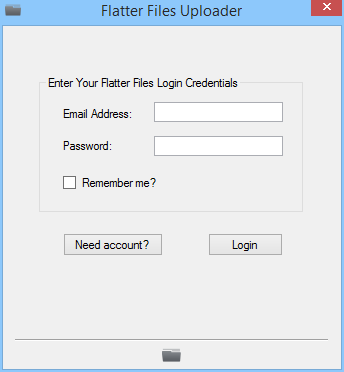
- Once the Uploader application is installed and opened, the dialog shown below will be displayed. Enter your credentials and then click “Login.”
- If successful and if this is the first time you have logged in to the Uploader, you will be presented with a welcome screen within the application. Click next and a dialog appears to configure your first upload folder. Skip to step 4 if you now see a window with the title “Configure Upload Folder.”
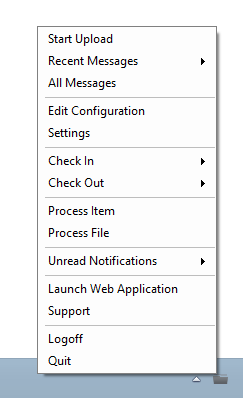
- If the welcome screen does not appear, then open the application menu by clicking the icon located in the bottom right of your task bar. This will open the menu shown below.
- Click “Edit Configuration.”
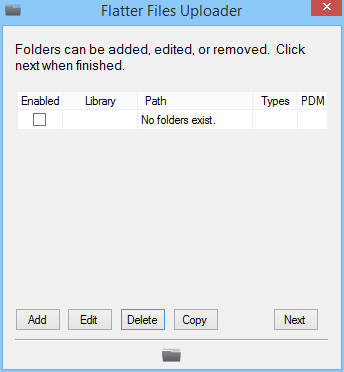
- The window shown below will be displayed.
- Click “Add” which will display the Configure Upload Folder window.
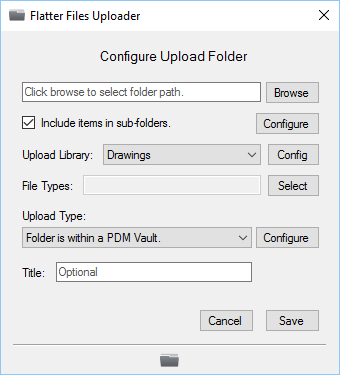
4. Configure Upload Folder
The Uploader application requires that you configure a folder for uploading. This folder that you configure is the only data that will be uploaded by Flatter Files. All configuration and settings are specific to the folder being configured. Multiple folders can be configured. This tutorial will only configure a single folder that contains all of your Workgroup PDM Vault data.
- You should now see this window:
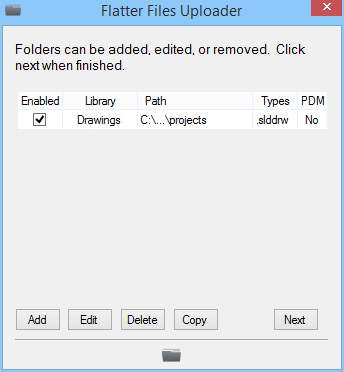
- Click the “Browse” button and browse to the folder called “projects” located in the Root Directory of your Vault. The Root Directory for your vault was determined in Step 1.
- Check the option “Include items in sub-folders” if it is not already checked.
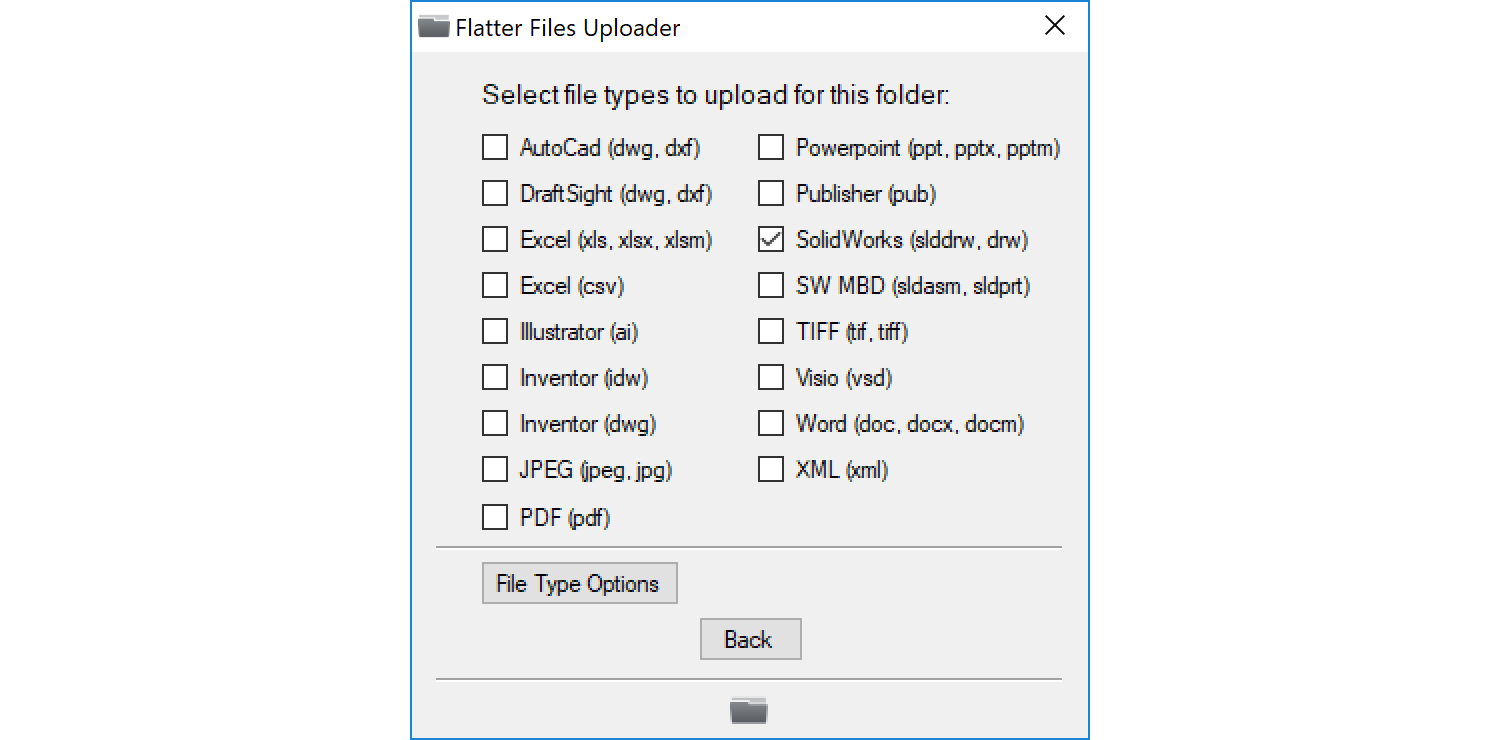
5. File Types
Flatter Files supports various file types. Each file type that you would like to upload other than PDF and Tiff requires an appropriate program to perform the processing. In this tutorial, SolidWorks must be installed for the purpose of processing the SolidWorks native files. The steps below will show you how to configure the Uploader to only upload the SolidWorks files contained in your Vault.
- Select the File Types to upload by clicking the button titled “Select.”
- This will display the image shown below:
- Enable the file type option titled “SolidWorks (slddrw, drw).”.
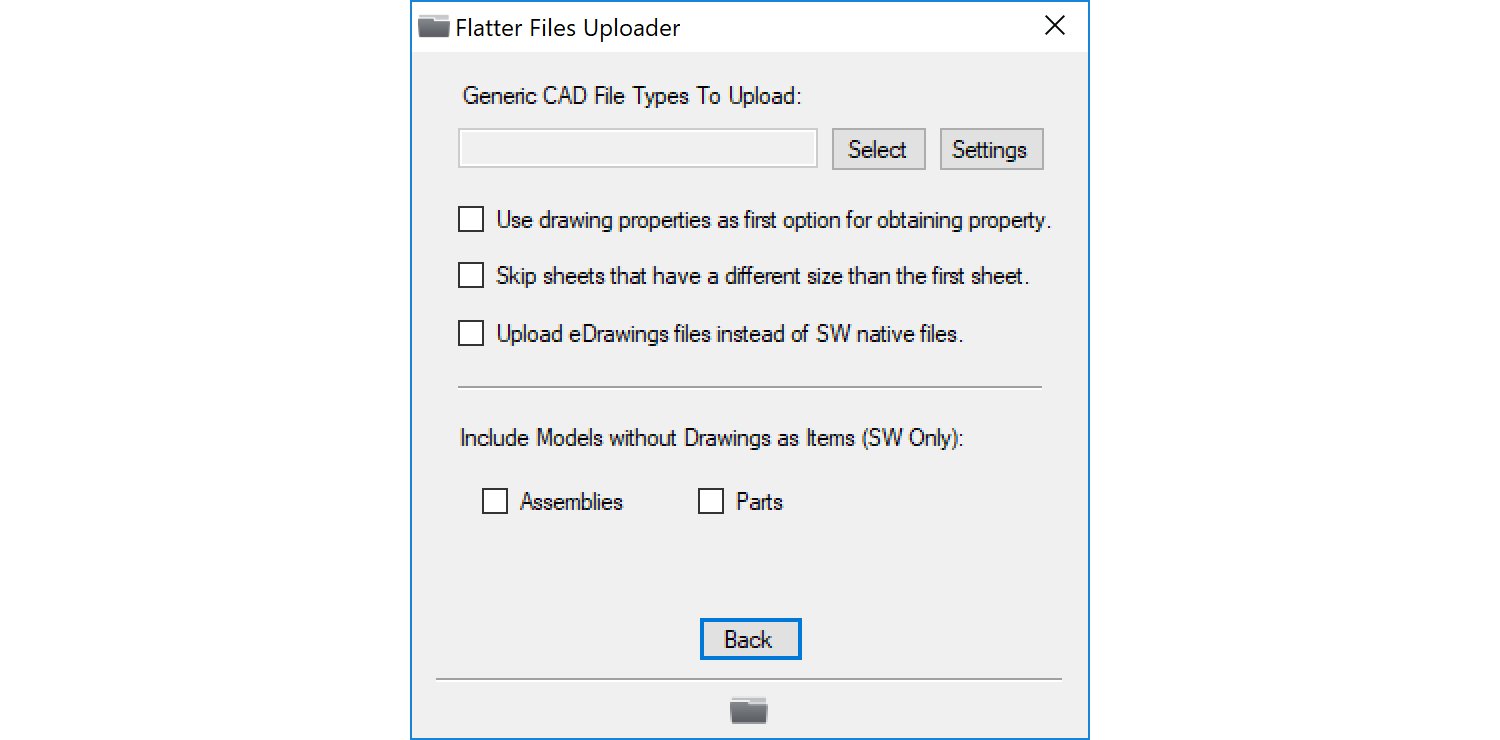
- Click the button titled “Inventor/SolidWorks Options”
- This window should now be displayed:
- The first option determines if the properties uploaded should be used from the Drawing or the Model. Enable this option if you keep the primary Part Number, Description, and other custom properties located in the Drawing instead of the Model.
- Check any Generic CAD file formats that you would like Flatter Files to create and upload automatically for each item.
- Click “Submit” to return to the File Types window.
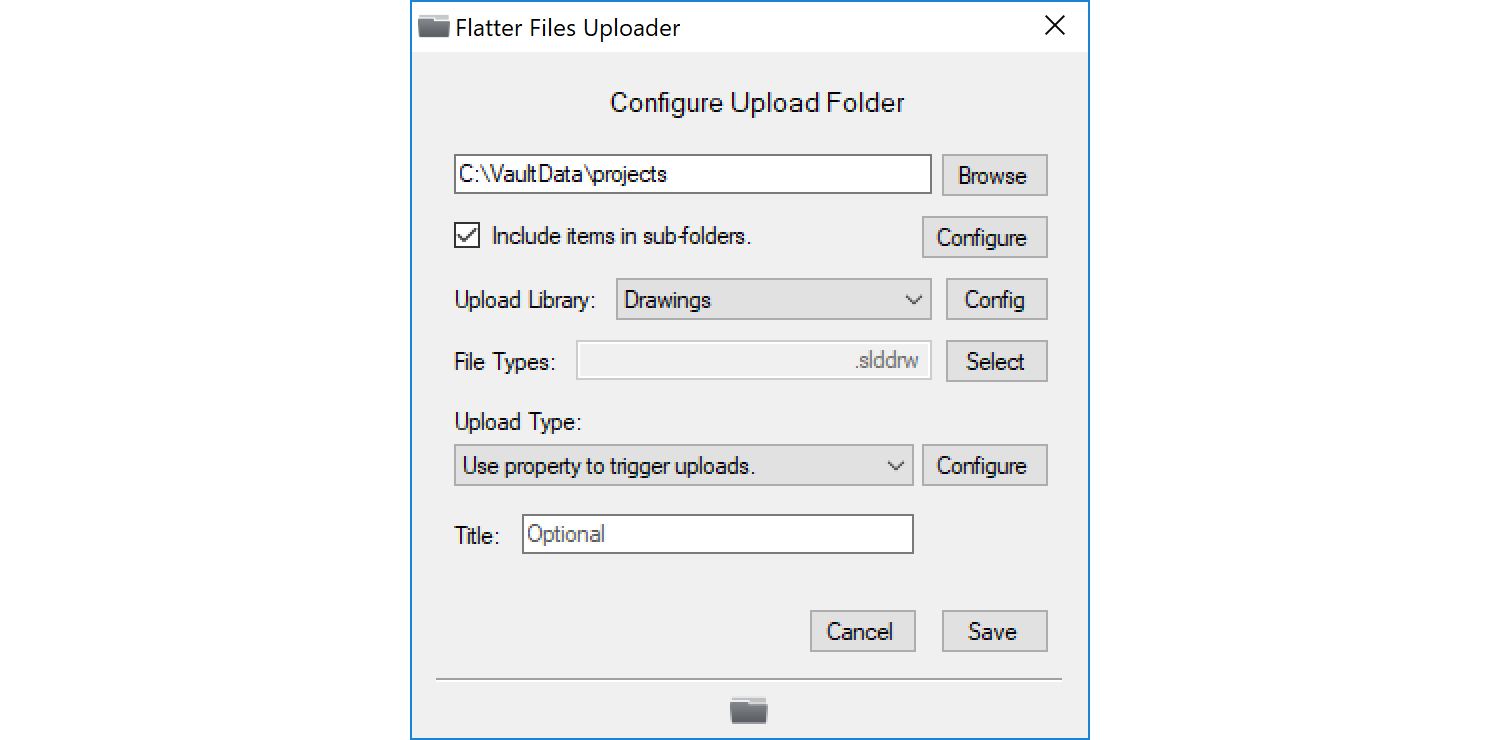
- Click “Submit” again to return the the Configure Upload Folder window, which is shown below.
6. Upload Trigger
This step will configure an Upload Trigger such that existing files are ignored until a user increments the revision in Workgroup PDM. This prevents drawings from being uploaded until they are ready to be released.
- Check the last setting, “Use Property To Trigger Uploads.”
- Click the “Configure” button.
- This will open the window shown below:
6a. Without Lifecycle Management
If you are using Lifecycle management within Workgroup PDM, please skip to Step 6b. Otherwise the steps below will configure the trigger to work such that the drawing are uploaded and released as soon as the revision is incremented within Workgroup PDM. The final settings are shown in the image following the steps.
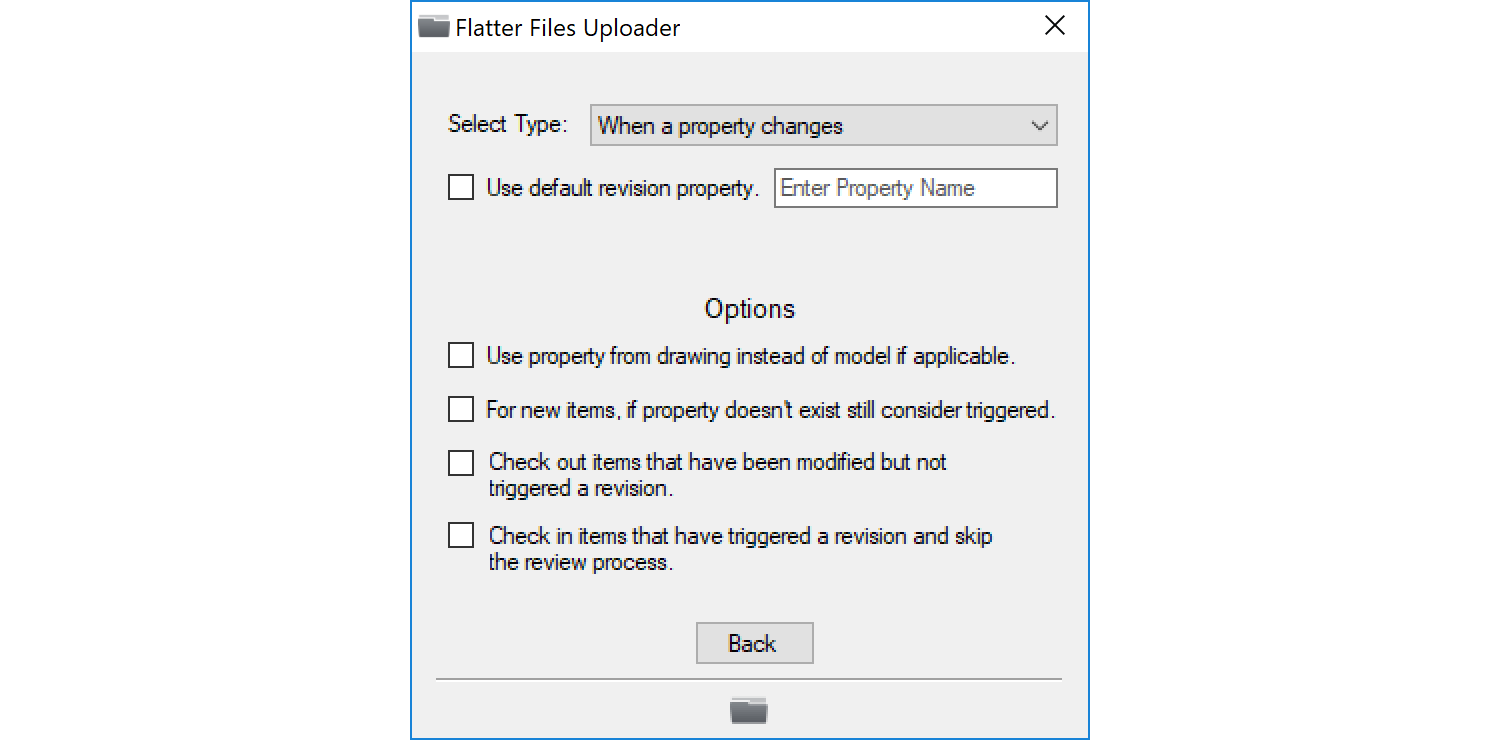
- Select the trigger type “When a property changes.”
- Check the option “Use default revision property.”
- Under Options, check the first option “Use property from drawing instead of model if applicable.”
- Check the second option “Check out items that have been modified but not triggered a revision.” For Workgroup PDM, this setting will also check out the item if someone has taken ownership of it.
- Check the last option “Check in items that have triggered a revision and skip the review process,” unless you want to use the Flatter Files Review Process.
- The Settings displayed should now appear as shown below:
- Click the “Submit” button, which will return you to the Configure Upload Folder window as shown below.
- Click the “Add” button to finalize the Upload Folder and save it. Skip to Step 7 to continue the tutorial.
6b. With Lifecycle Management
The steps below will configure the upload trigger to work such that the drawing must have a new revision created and be in the released lifecycle state before the drawing is uploaded. The final settings are shown in the image following the steps.
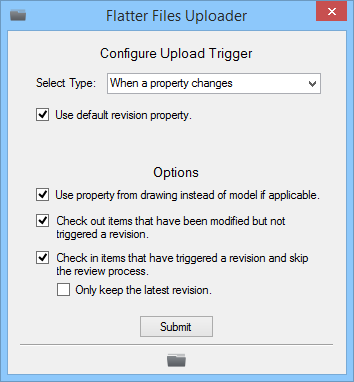
- Select the trigger type “When both occurs.”
- Check the option “Use default revision property.”
- Enter “Status” into the Name input.
- Enter your Release lifecycle state for the Value. Typically this is equal to “Released” or “Approved” and is the state that will be required for the item to be in before it will be uploaded to Flatter Files.
- Under Options, check the first option “Use property from drawing instead of model if applicable.”
- Check the second option “Check out items that have been modified but not triggered a revision.” For Workgroup PDM, this setting will also check out the item if someone has taken ownership of it or if it is not in the released lifecycle state.
- Check the last option “Check in items that have triggered a revision and skip the review process,” unless you want to use the Flatter Files Review Process.
- The Settings displayed should now appear as shown below:
- Click the “Submit” button, which will return you to the Configure Upload Folder window as shown below.
- Click the “Add” button to finalize the Upload Folder and save it.
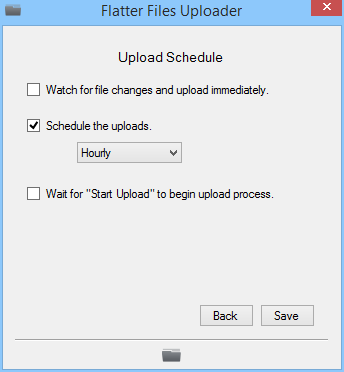
7. Schedule the Uploads
This step will allow you to configure the Uploader to perform uploads based on a schedule. Ideally you want the uploads to occur fairly regularly such that your data stays very current. Typically scheduling an upload to occur every 1-4 hours is ideal. When an upload occurs, the first thing it does is check for any changes, if none have occurred then nothing is uploaded.
- The Folder List window should now be displayed as shown below:
- Click next to display the Upload Schedule Options as shown below:
- Select the schedule that makes the most sense for your available resources. I would recommend enabling the second option and selecting a schedule of something between 1 and 4 hours.
- Click the “Save” button.
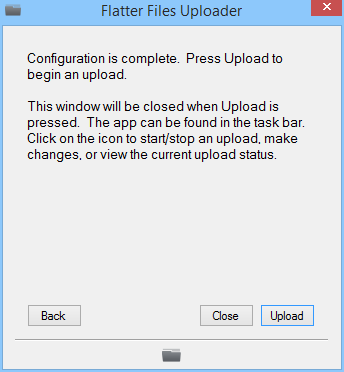
8. Start Upload
This step will manually start the first upload. Only items that have a Revision in Workgroup PDM and aren’t owned by any users will be uploaded.
- The image below should now be shown:
- Click the “Upload” button to perform the first upload.
- The window will now be closed.
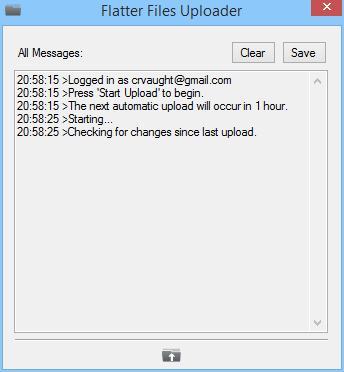
- To view the status click the icon in the task bar to display the menu.
- Select the option “All Messages.”
- The window displayed is shown below:
- A log of messages will continuously be added during the upload process. Once complete the last message will indicate the amount of time until the next upload.
- Viewing the messages during the upload is not required or by any means necessary during normal operation.
NOTE:
If you are using the Flatter Files review process then your files will be uploaded but won’t be accessible until you check the files in. Please consult the Review Process documentation for details on how to check the items in for review.
9. View Drawings in Web Application
At this point, your drawings are now accessible for viewing in the Flatter Files web application as well as on the mobile applications for iPhone, iPad, and Android. The steps below will view a drawing in the web application.
- Click this link to open the web application or go to www.flatterfiles.com and click Login at the top right.
- Enter your Login credentials.
- Your uploaded drawings will be shown, double click on an item to display the PDF or enter a search query in the top right search box to located the specific drawing.
- Additional details regarding drawing access can be found here
10. Ownership and Create Revisions
When ownership is taken by a user within Workgroup PDM the drawing will automatically be checked out from Flatter Files during the next upload process. By default a checked out item is still accessible on Flatter Files but a warning will appear. Optionally, checked out items can be blocked under Company Settings.
- Once your drawing is ready for a new revision, check the drawing in to Workgroup such that the revision is incremented and release ownership.
- The next scheduled upload will create the new revision on Flatter Files.
- If you would like to upload the new revision immediately then click “Start Upload” from within the Uploader menu.
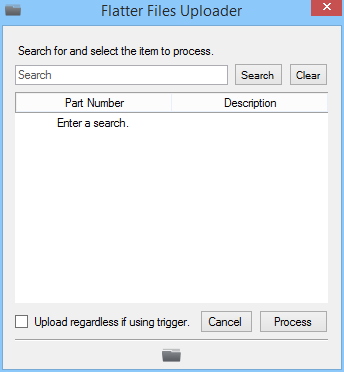
11. Overwrite Revision
Often you create a revision and shortly after the revision is created you notice a small typo or similar mistake. If you have enabled the setting “Allow latest revision overwrite” in the PDM Workgroup Vault Settings, then Workgroup allows you to take ownership, make the change, and then when checking the item back in you can enter the current revision as the new revision. This will overwrite the current revision but it doesn’t automatically trigger an upload since the revision value is the same. Here are the steps to force an upload for a specific item.
- Open the Uploader menu.
- Click the “Process Item” option.
- Locate the item by searching for the item.
- Select the specific item in the search results.
- Check the option “Upload regardless if using Trigger.” This will force an upload even if the revision trigger hasn’t been met.
- Click the “Process” button.
12. Complete
This tutorial is now complete. Your account should now be integrated with your SolidWorks Workgroup PDM Vault. As you create new revisions in Workgroup they will now also automatically be uploaded to Flatter Files. If you have any questions or need additional help please email [email protected].